Setup
Once the iDynamics Commissions 365 Sales Connector extension has been installed in a Business Central environment, it needs to be configured to automate the synchronization of commissions and sales from Business Central with the Dynamics 365 Sales environment already connected and synchronized in the standard way.
A series of steps need to be followed which, once done, usually do not need to be modified again.
Requirements
This must be done with a user who is an Environment Administrator, since a Microsoft Entra ID needs to be created, as well as job queues for the synchronization of commissions and sales. If created by a user without execution permissions, the scheduled synchronization would not work.
The standard synchronization between Business Central and Dynamics 365 Sales must be configured and running, so if it is not, this should be the first step. What needs to be synchronized is the following:
- All Dynamics 365 Sales users must be coupled with their corresponding Business Central salespeople, since commissions are generated for salespeople. This is also necessary for security to work in Dynamics 365 Sales.
- To be able to synchronize commissions and sales, in addition to salespeople, currencies and customers must also be synchronized with Dynamics 365 Sales.
- To be able to preview commissions for Dynamics 365 Sales opportunities, quotes and sales orders, items and resources must also be synchronized.
Last but not least, the base currency of Dynamics 365 Sales must match the local currency of Business Central.
The iDynamics Commissions 365 Sales solution must be installed in the Dynamics 365 Sales environment connected in the standard way with Business Central, otherwise configuring the iDynamics Commissions 365 Sales Connector extension in Business Central will fail.
Since this involves the standard synchronization between Business Central and Dynamics 365 Sales, we refer to the official Microsoft documentation for this and to the usual partner for assistance.
Setup wizard
The best option is to use the setup wizard included in our extension, which will guide you step by step for greater clarity. The wizard will show an error and cannot be opened if the standard synchronization requirements mentioned above are not met.
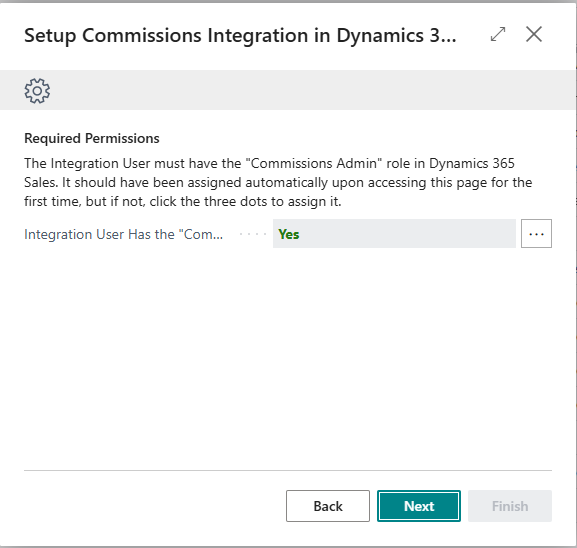
When starting the setup wizard, the "Commissions Admin" security role is automatically assigned to the standard integration user between Business Central and Dynamics 365 Sales. This is a necessary step for the synchronization of commissions and sales between both environments to work, but it is transparent to the user. This screen simply indicates that this automatic assignment has been made, which will be the usual case. If that were not the case, you would not be able to continue, in which case it is best to request assistance through our support portal.
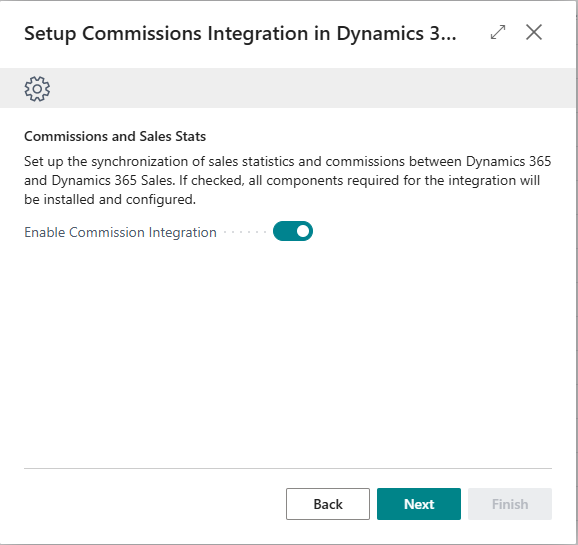
Next, a screen is shown to activate the synchronization of commissions and sales with Dynamics 365 Sales.
If the synchronization of commissions and sales with Dynamics 365 Sales has been activated, a new screen is shown where you can optionally configure email notifications for synchronization errors.
- If not configured now, it can be configured later from the Dynamics 365 Sales Integration Setup page page.
- In fact, the recommendation is not to activate it until the initial synchronization has been completed to avoid receiving many emails if it fails for any reason, since a large number of records — all existing commissions and sales — are synchronized.

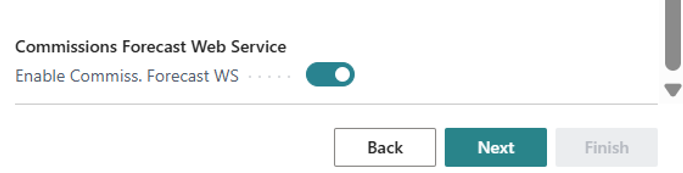
Finally, you can activate the web service for commission forecasting for Dynamics 365 Sales opportunities, quotes and sales orders. This is the most complex step, so each option is detailed below for correct configuration. However, it can be left unconfigured at this point and revisited later — it does not need to be fully configured in one session.
Before being able to activate this web service, a number of required parameters need to be configured.
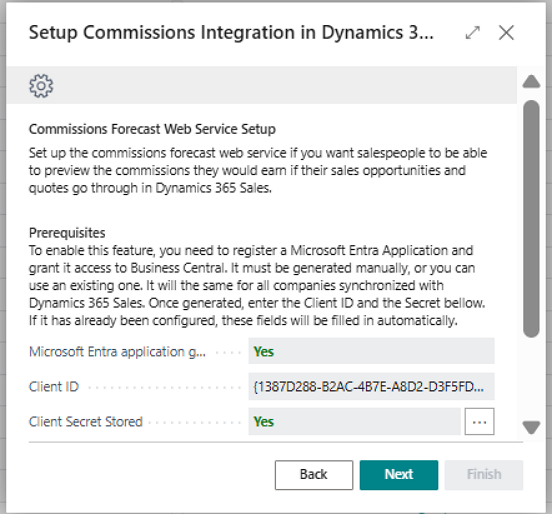
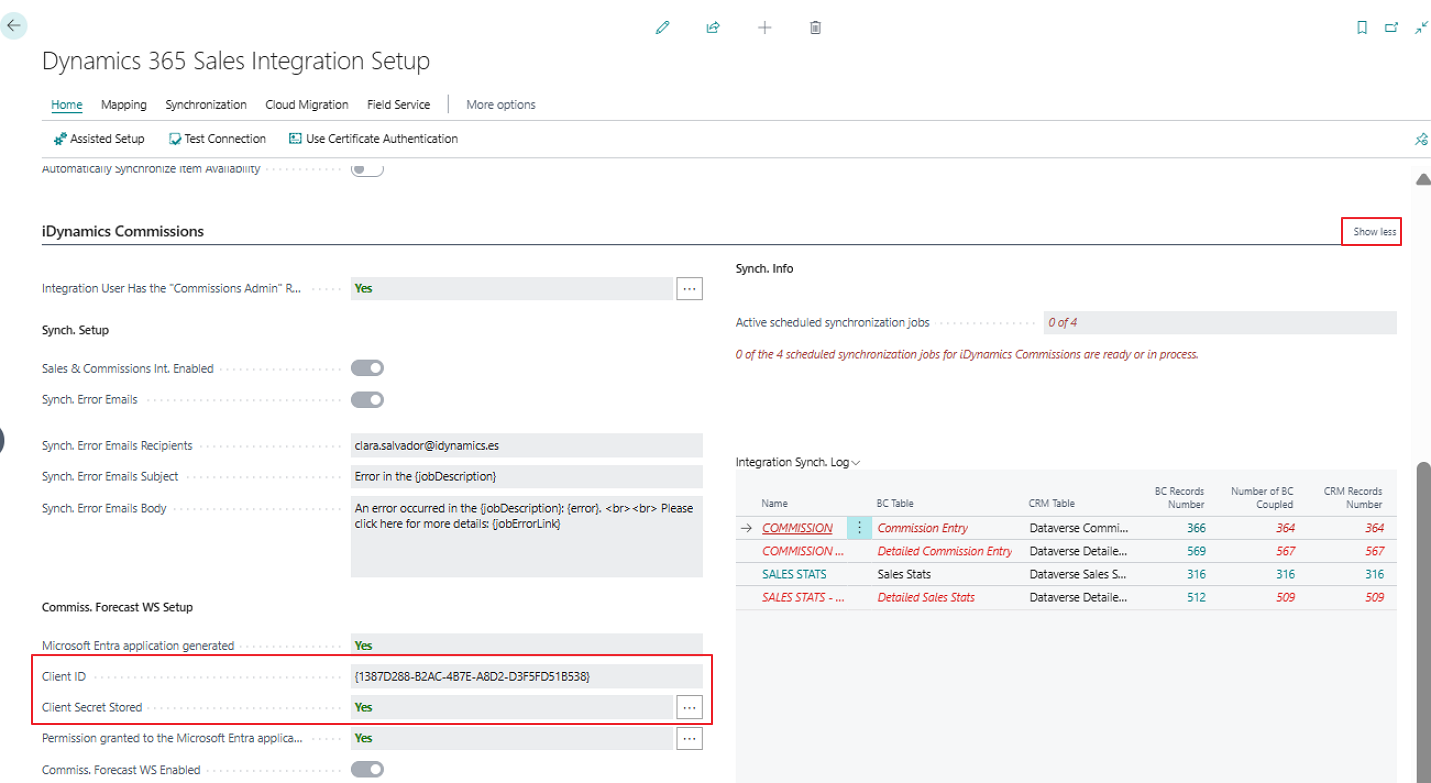
- Microsoft Entra ID generated. Filled in automatically. By default it will say "No" and will change to "Yes" when the following "Client ID" field is filled in.
- Client ID. You can use an existing Client ID or create a new one, although the recommendation is to use one specifically for this commission forecast web service. In either case, it must be filled in here. If you do not already have one, or do not want to use an existing one, you need to create it outside of this wizard and, once done, specify it here.
- Client Secret Stored. By default it will be "No" and, to change it to "Yes", you need to click the three dots, which displays another screen to enter the password. This is not saved in the configuration for security reasons and therefore must be noted down because it will not be shown again.
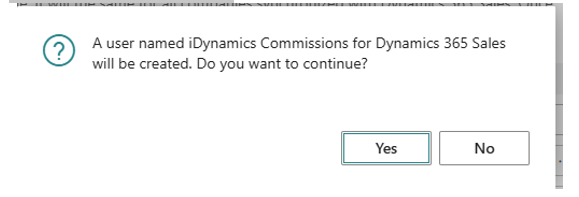
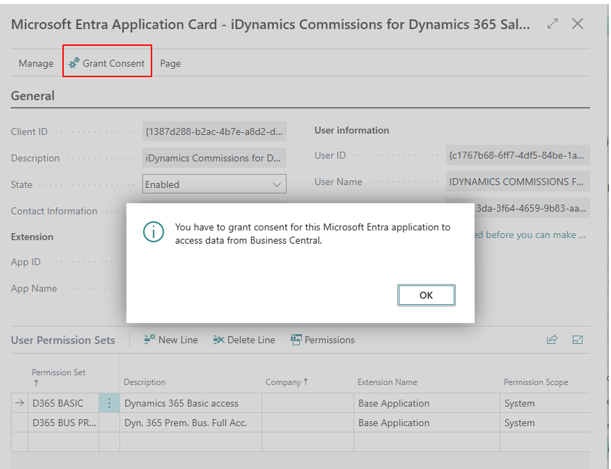
- Permission granted to the Microsoft Entra ID for BC. Finally, this Microsoft Entra ID needs to be registered in Business Central and granted permissions explicitly. This can be done manually, but we recommend clicking the three dots so it is done automatically, which creates a Microsoft Entra Application in Business Central called "iDynamics Commissions for Dynamics 365 Sales" and automatically assigns it the required permission sets. This must be done by a user with SUPER permission in Business Central.
Once generated, the Microsoft Entra Application page in Business Central is displayed so that permissions can be explicitly granted manually. A message is shown indicating this, so you need to click the "Grant Consent" action. Only an Environment Administrator can do this, and they must also be a user with SUPER permissions in Business Central.
If all these steps are not completed, you cannot continue — that is, you cannot activate the web service for commission forecasting from Dynamics 365 Sales, which is the last step. However, you can leave the configuration partially done, so that what has been configured will be saved if you click Finish on the next screen.
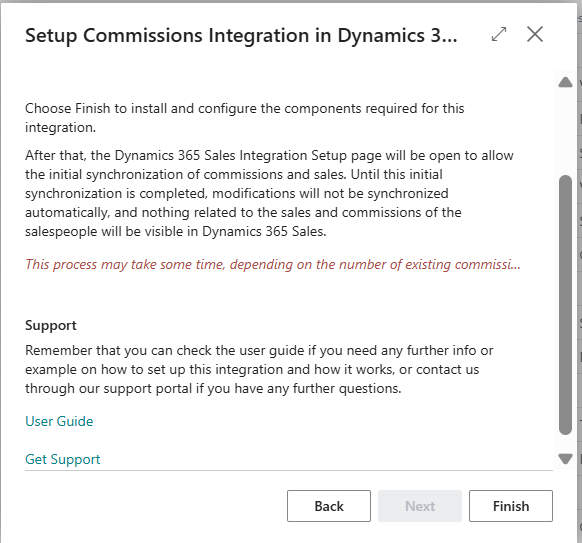
Whether or not the commission forecast web service with Dynamics 365 Sales has been configured, moving to the next screen takes you to the final screen. It is when you click the Finish action that all the configuration is saved in the Dynamics 365 Sales Integration Setup page record, which our connector extends, and it is then displayed on screen. If you do not do this, everything configured in the wizard will be lost.
The wizard can be run as many times as needed, for example if it was left half-done.
Dynamics 365 Sales Integration Setup page page
Everything that can be configured using the setup wizard can also be done manually in the iDynamics Commissions section that our iDynamics Commissions 365 Sales Connector extension adds to the standard Dynamics 365 Sales Integration Setup page page.
Some fields are hidden by default, such as the Client ID and Client Secret Stored, but clicking "Show more" shows all of them.
Another important aspect to keep in mind is that all data for this Microsoft Entra Application can only be edited if the commission forecast web service is disabled. Therefore, if it is necessary to modify them — for example because they have expired — the commission forecast web service must be deactivated first (since it will not work from the Dynamics 365 Sales environment if expired), and the Client ID and other data modified once a new one has been generated or the existing one extended, then reactivate it.
It is also important to note that from the wizard you can only activate the commission forecast web service as well as the synchronization of commissions and sales. If you want to deactivate either of them, this must be done through the Dynamics 365 Sales Integration Setup page page.
Subscription information
At the bottom of the Dynamics 365 Sales Integration Setup page page, a "Subscription Information" section is added showing the subscription status of the iDynamics Commissions 365 Sales Connector extension. You can find more information about subscription types, and the information shown in this section, in the licensing chapter.