Basic Concepts
In order to be as user-friendly as possible, managing warehouse documents always requires the same set of actions: move to a bin, scan its code, scan the code of an item (or manually select it on screen), confirm the quantity being placed/taken out, and repeat until all the lines of the document are completed.
The First Steps Guide explains how to use the application to handle a purchase order, and is the recommended starting point for understanding how to use the application. Once you have followed the guide, this document is intended to go a little deeper into the interface of the mobile application, and the options available in it.
Document Lists
Whether it is sales orders, receipts or pick documents, it is most likely that we will access a list of documents to handle from the home screen.
Document lists always have a similar format, showing the document code (and some useful description, if any), the assigned user (under the document code) and the number of lines included within it.
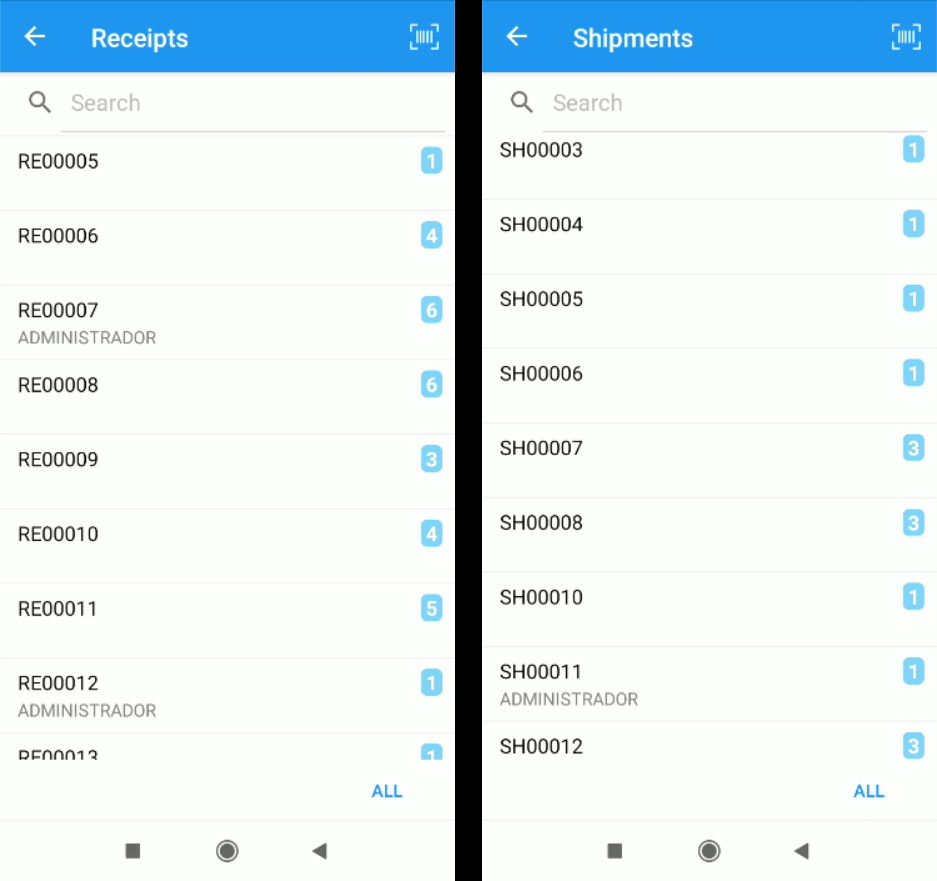
In this example, of location receipts, we can see that the document RE00007 has 6 lines to receive and is assigned to the user ADMINISTRADOR.
The documents RE00006 and RE00005, located just above, on the other hand, are not assigned to any user and are ready to be locked by the first available warehouse employee in order to start working with them.
All listings have a search bar at the top, where you can search by document code, and a filter at the bottom to show only those that are assigned to the application user. In addition, all of them allow scanning a barcode (corresponding to a document code) to access it directly.
Document Locking
Warehouse documents can come already pre-assigned to a particular employee, or be available for employees themselves to work with each of the documents as they become available. In the latter case, any document that has not been pre-assigned will have a Lock action available at the bottom of the screen so that employees themselves can lock them.
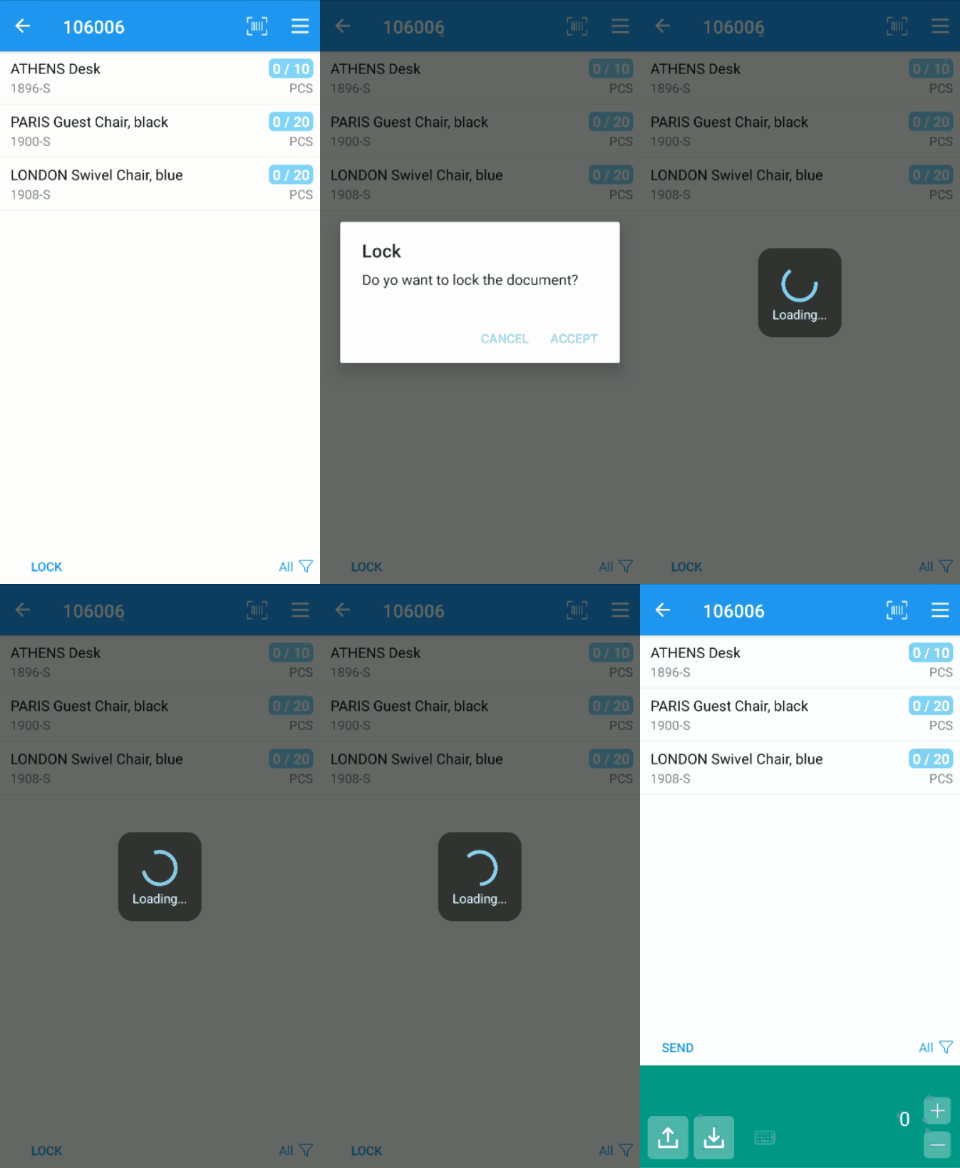
We will know that the document has been correctly locked for us because the action will disappear, replaced by the Send option, and a new lower panel will be displayed, in green, allowing us to interact with the selected lines at any time.
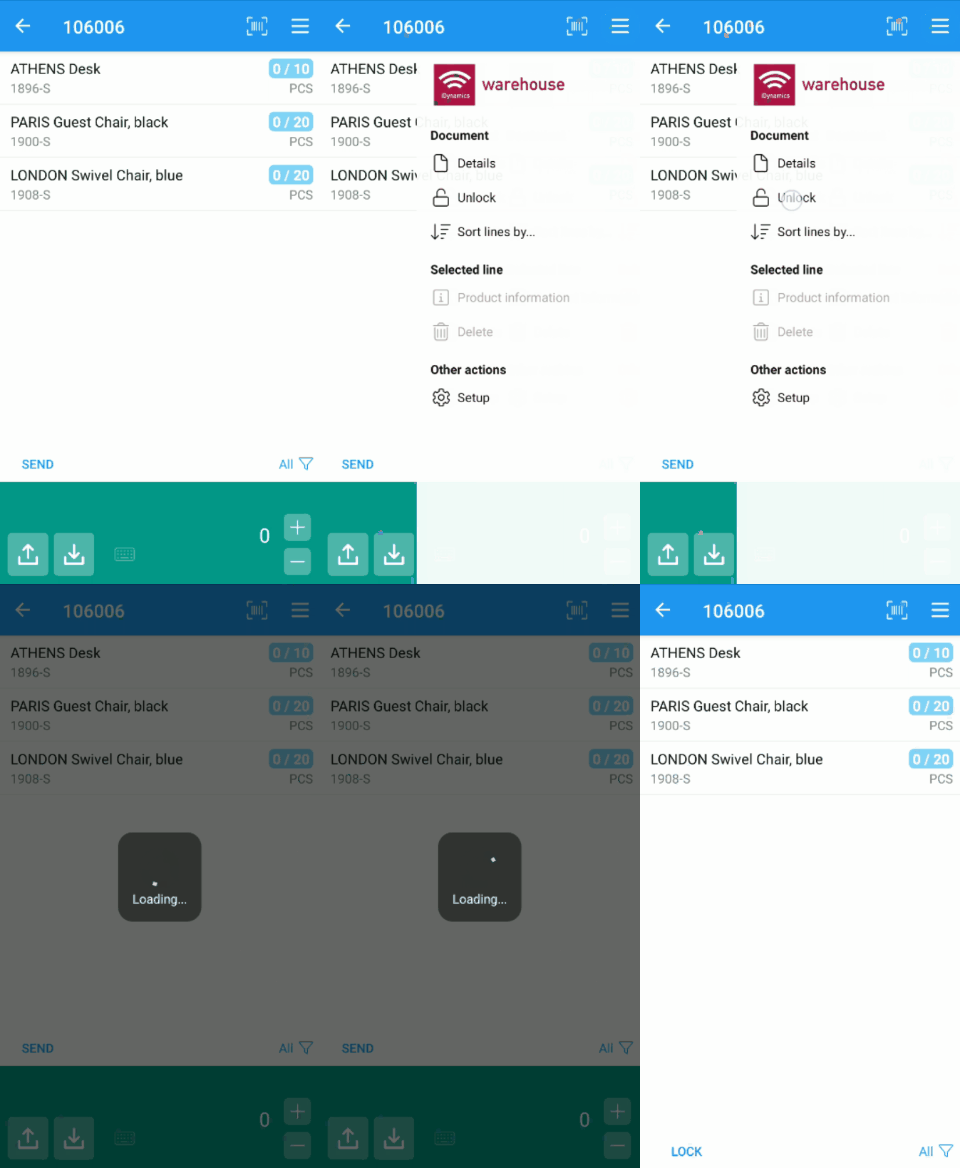
If we have locked the document by mistake, we can unlock it again from the document menu, accessible by clicking on the three lines at the top right of the screen, or by sliding the screen to the left in the document list.
Document Details
Information about the document you are working with can be viewed at any time by clicking on the menu button at the top right of the document and selecting the Details option in the Document section.
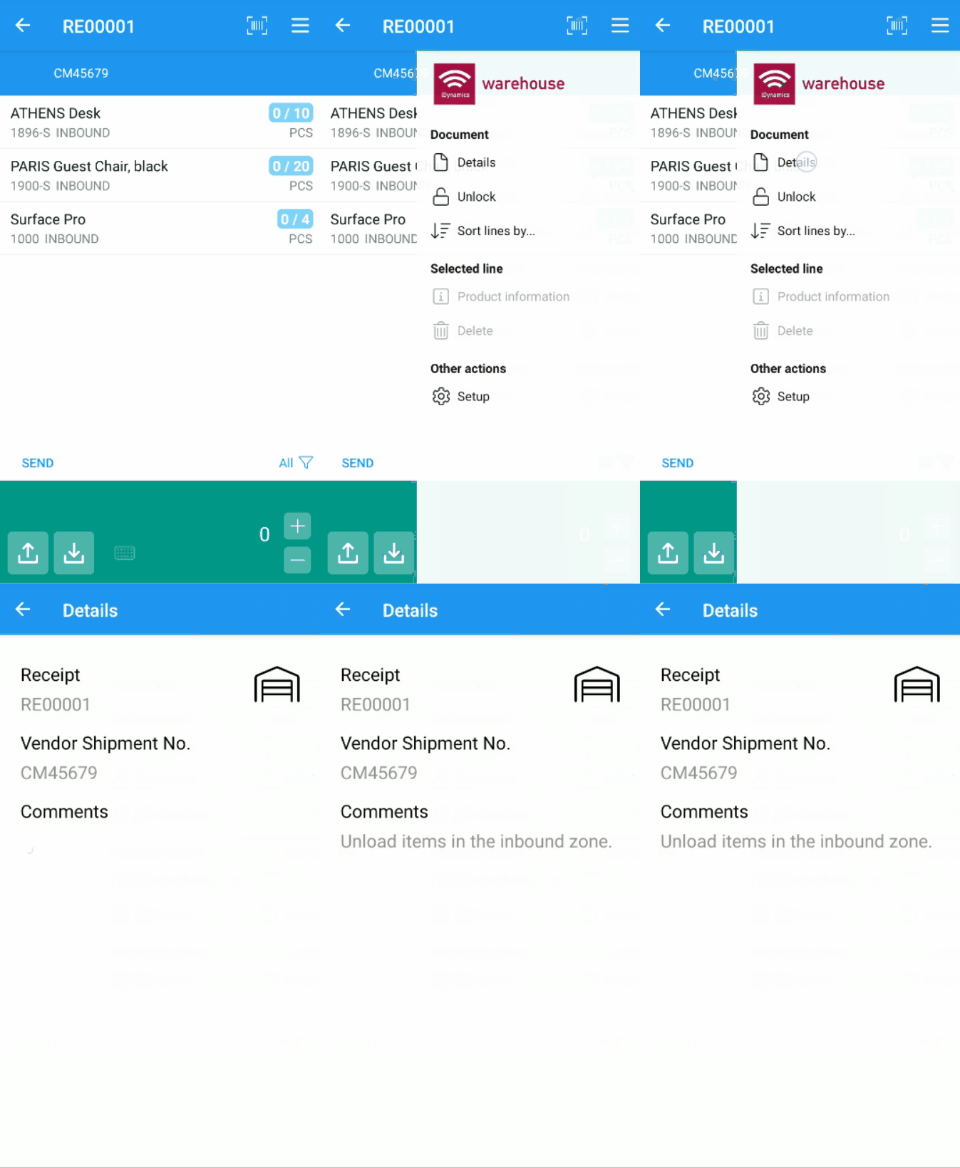
The information available will vary depending on the type of document.
Bin Selection
Bins, in Dynamics 365 Business Central, are the codes that identify the exact whereabouts of an item (e.g. a combination of row, column and shelf). The system allows you to work with bins and know exactly where each item is located, or without bins, keeping track only of the total inventory available in the warehouse.
In case of working with bins, the first step, before handling a document line, is to select the bin from which we are going to take, or in which we are going to place, the item. To do this, the quickest way to work is to scan a barcode pasted on the physical bin itself.
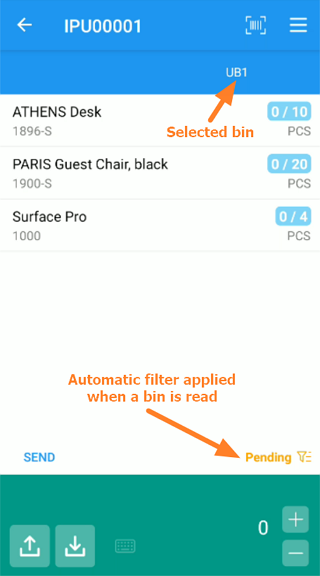
In the above screenshot, we can see that the bin, when selected, is displayed at the top of the screen, below the barcode scanning button. You can click on the bin code at any time to query the items available in that bin.
When scanning the code of a bin, the list of lines will be automatically filtered to show those items pending handling that are assigned to the bin or, if none are assigned to it, the list of pending items in general.
In case the label does not exist, is not readable, or we are testing, we can manually enter the bin code by clicking on the barcode icon at the top right.
Item Selection
Once we have selected the bin we are in (if we are working with them), we are going to select the item line to handle. To do this, we can either click on the line or, more advisable, scan its barcode.
Scanning the barcode (instead of selecting the item on the screen), guarantees that the item we are handling is the one we thought it was, as well as allowing us to obtain information about the lot, series, or expiration date, if these are encoded on the label.
In addition, scanning the barcode (which can also be entered manually with the button at the top right of the screen) will filter the records on the screen to show only those that correspond to the selected item. It is worth remembering that the same Business Central document could have multiple lines of the same item and filtering by it ensures that we are really done with it before moving on to another.
Assign Quantity to Line
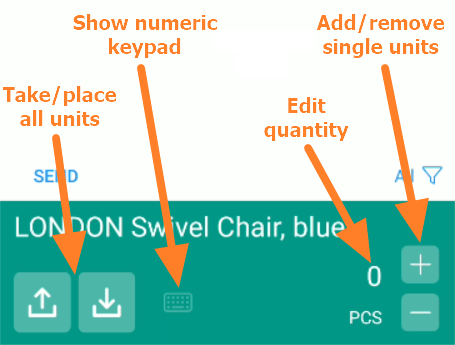
With the bin and the item selected, the only thing left to do is to indicate the quantity we are going to handle. To do this, we have the quantity panel, in green color and located at the bottom of the screen, which allows us to:
- Click on the take/place all buttons (at the bottom left), to complete the line immediately.
- Select the quantity unit by unit, by clicking on the + and - buttons on the right side of the panel.
- Enter the exact quantity by clicking on the numeric value of the quantity.
Once we edit the quantity of a line, we will see how a pencil icon appears in front of it to indicate that it is modified and is pending to be sent to the server.
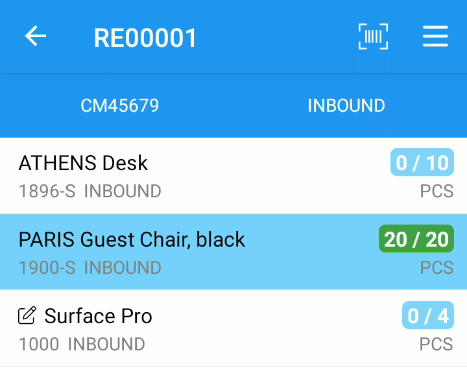
In addition, the blue, green, or yellow color of the quantity allows us to visualize immediately if the line is pending to be handled, if it is completed, or if it is only partially completed.
Sublines
Sometimes, what was a single line assigned to the user, when specifying quantity, can be converted into several sublines with different lots/series, and/or bins, depending on the options allowed by the selected document.
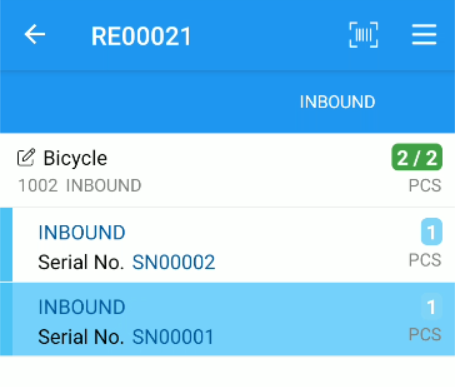
In the example above, line 1000 has been broken down into two distinct sublines, in order to indicate the serial number corresponding to each of the two units received.
The sublines are easy to identify because they are preceded by a blue bar, which goes up to the line to which they are associated, and because they contain only the particular information that distinguishes them from the parent line (they have no description or item code).
The creation of the sublines is automatic, being the application itself which will create them, when selecting a line or scanning a barcode, if it considers it necessary (e.g. because there is more than one lot, series, or bin associated to the same line).
To delete a sub-line you can leave the quantity at zero (the application will automatically delete it when changing lines), you can drag it to the left over the line or you can use the Delete Line action, available in the document menu.
Send Data to the Server
From the moment we block a document (or download it, if it is already assigned to us) until the moment we finish with it, the application will work autonomously, without the need to connect to the server. This allows the employee to work in an agile way and without pauses, without the need for the Wi-Fi coverage of the warehouse to be complete.
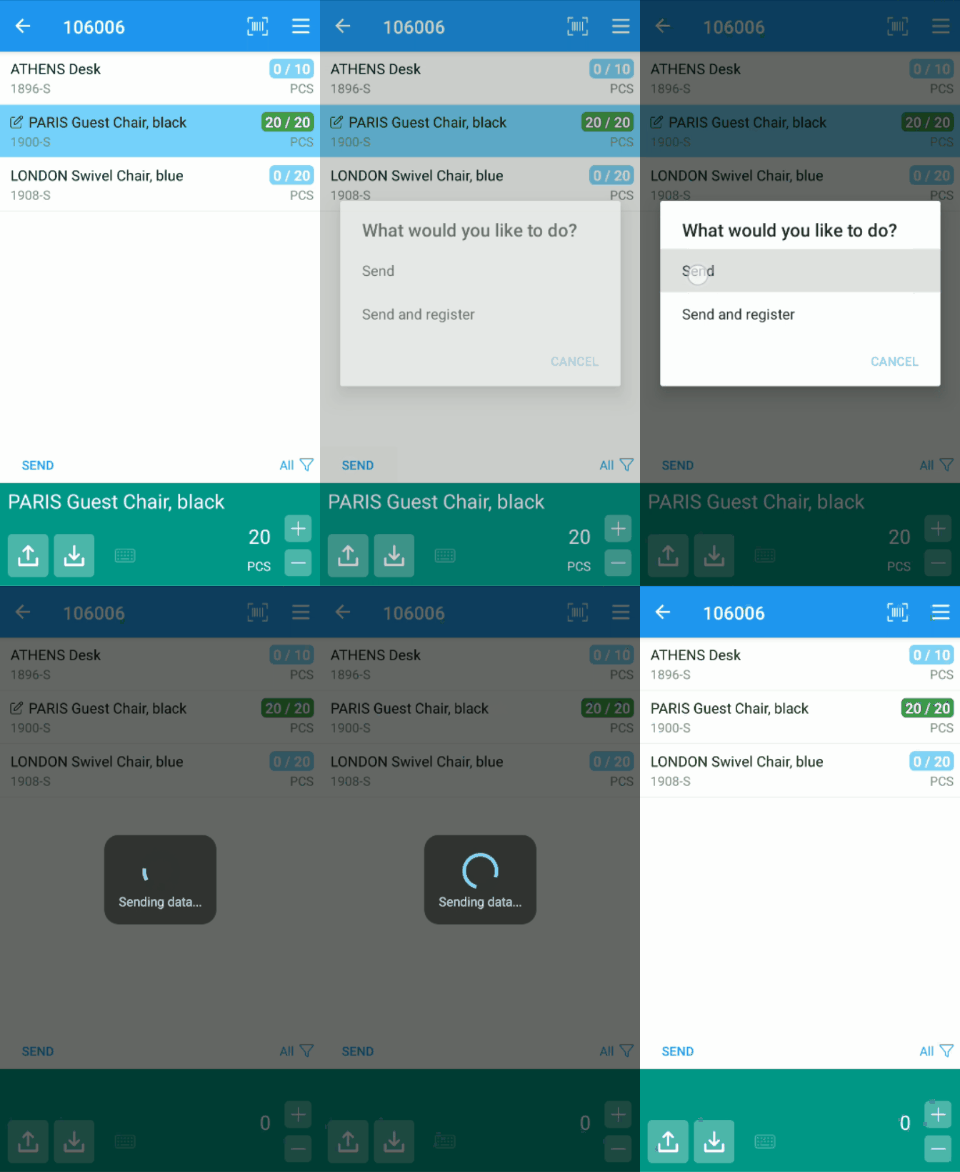
Once we have indicated the quantity of some line, we can, at any time, press the Send button, located at the bottom left of the list of lines, to send all our activity to the server. When this is done, we will see how the Modified icon, shown to the left of each item's name, disappears.
Send and Finish
This option, available to users who do not have Automatic Post marked on their warehouse employee card, will send the data to the server and mark the document as Processed.
This has two implications:
- The document will disappear from the device.
- Any incomplete line will be considered as not having been processed due to an incident.
Send and Post
This option replaces Send and Finish when the user has the Automatic Post check mark on his warehouse employee card, this option will send the data to the server and will post the document, generating the corresponding movements.
Once this is done, if the Unassign On Post option in the location is checked, the document will be closed and the user will be returned to the document list. Otherwise, the user will be able to post as many times as required until the document is completed.
Line Filters
At the bottom of the list of lines of a document, we have a filter button, which allows us to toggle between displaying all the lines of the document, or only the pending ones.
However, this button has a special function, when scanning the barcode of an item, which is interesting to know:
- When scanning the barcode of an item, it automatically applies a filter by item code, displaying only the lines corresponding to it.
- When you click on the button, this filter will be deactivated, and another default filter will be applied, depending on the following conditions:
- If there are other items in the document that should be handled in the active bin, and are pending, removing the filter by item will show us these items. (the filter "pending in the bin" will be applied).
- If there are no pending lines in the bin, the filter of pending lines in the document will be applied.
- If there are no pending lines in the document, all the filters will be removed.
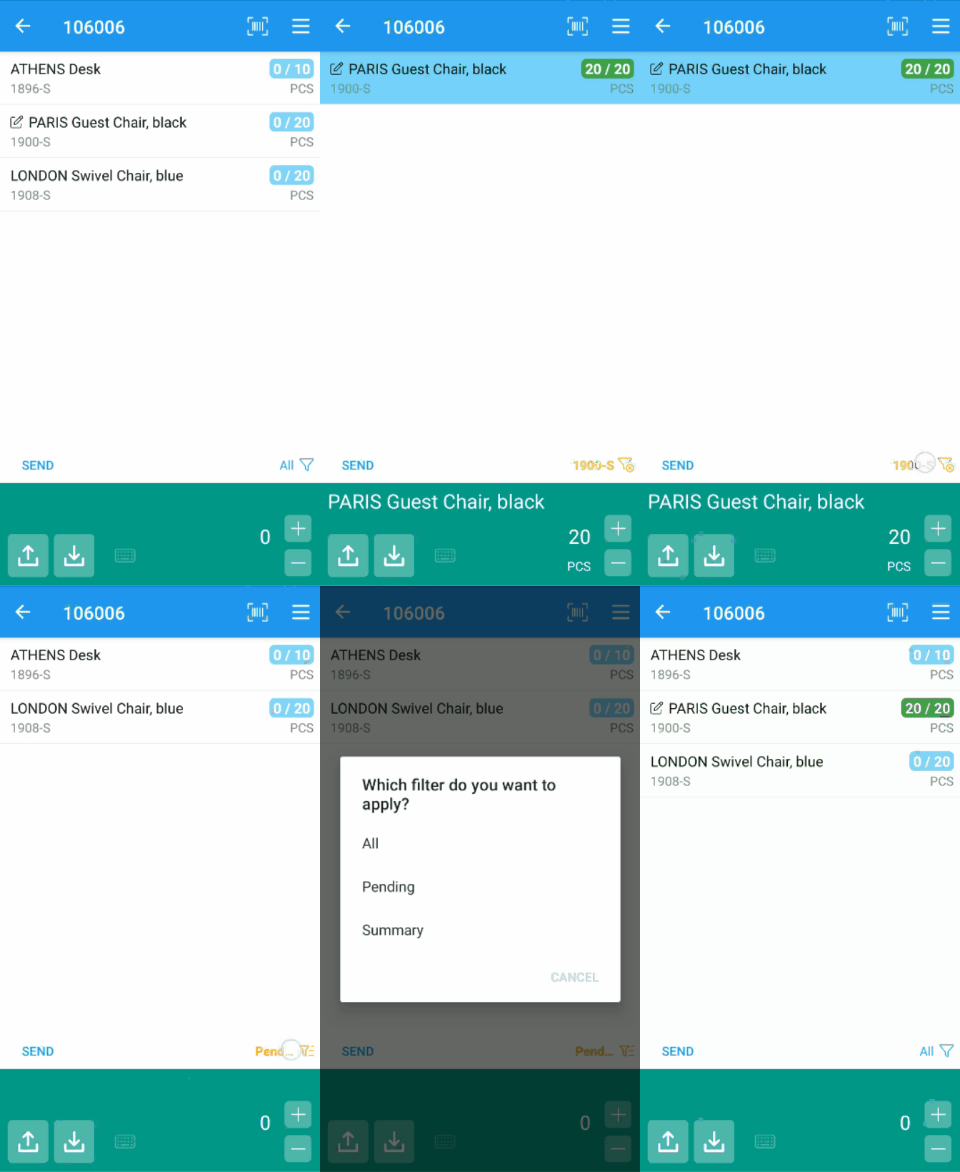
The purpose of the above operation is to allow users to perform an optimized cycle of work, consisting of:
- Scan a bin (if the location uses bins).
- Scan an item (the item filter will be activated).
- Enter quantities until the item is complete.
- Remove filter, to see pending lines, and return to points 1 or 2, depending on the bin of the next item.