Setup
The steps required for a user to connect from the iDynamics Warehouse mobile app to Business Central are as follows:
- Install the iDynamics Warehouse application for Business Central.
- Have set up at least one location in Business Central.
- Assign the corresponding permission set to the user.
- Configure the user as a warehouse employee.
The first steps guide describes how to perform all the steps, except for assigning permissions (it is understood that the administrator who has installed the application will have SUPER permissions).
The different setup options that iDynamics Warehouse adds to warehouse management are detailed below, in addition to those that apply to the configuration of the mobile application.
Locations
In order to use iDynamics Warehouse, it will be necessary to have at least one location created in the system. The setup of the location will depend on the needs of each customer, and depending on what is selected, the application will allow you to work with warehouse documents (receipts, shipments, pick, etc.) or directly with sales and purchase documents. If you don't have one yet, the first steps guide will explain how to set up a location and manage it using iDynamics Warehouse.
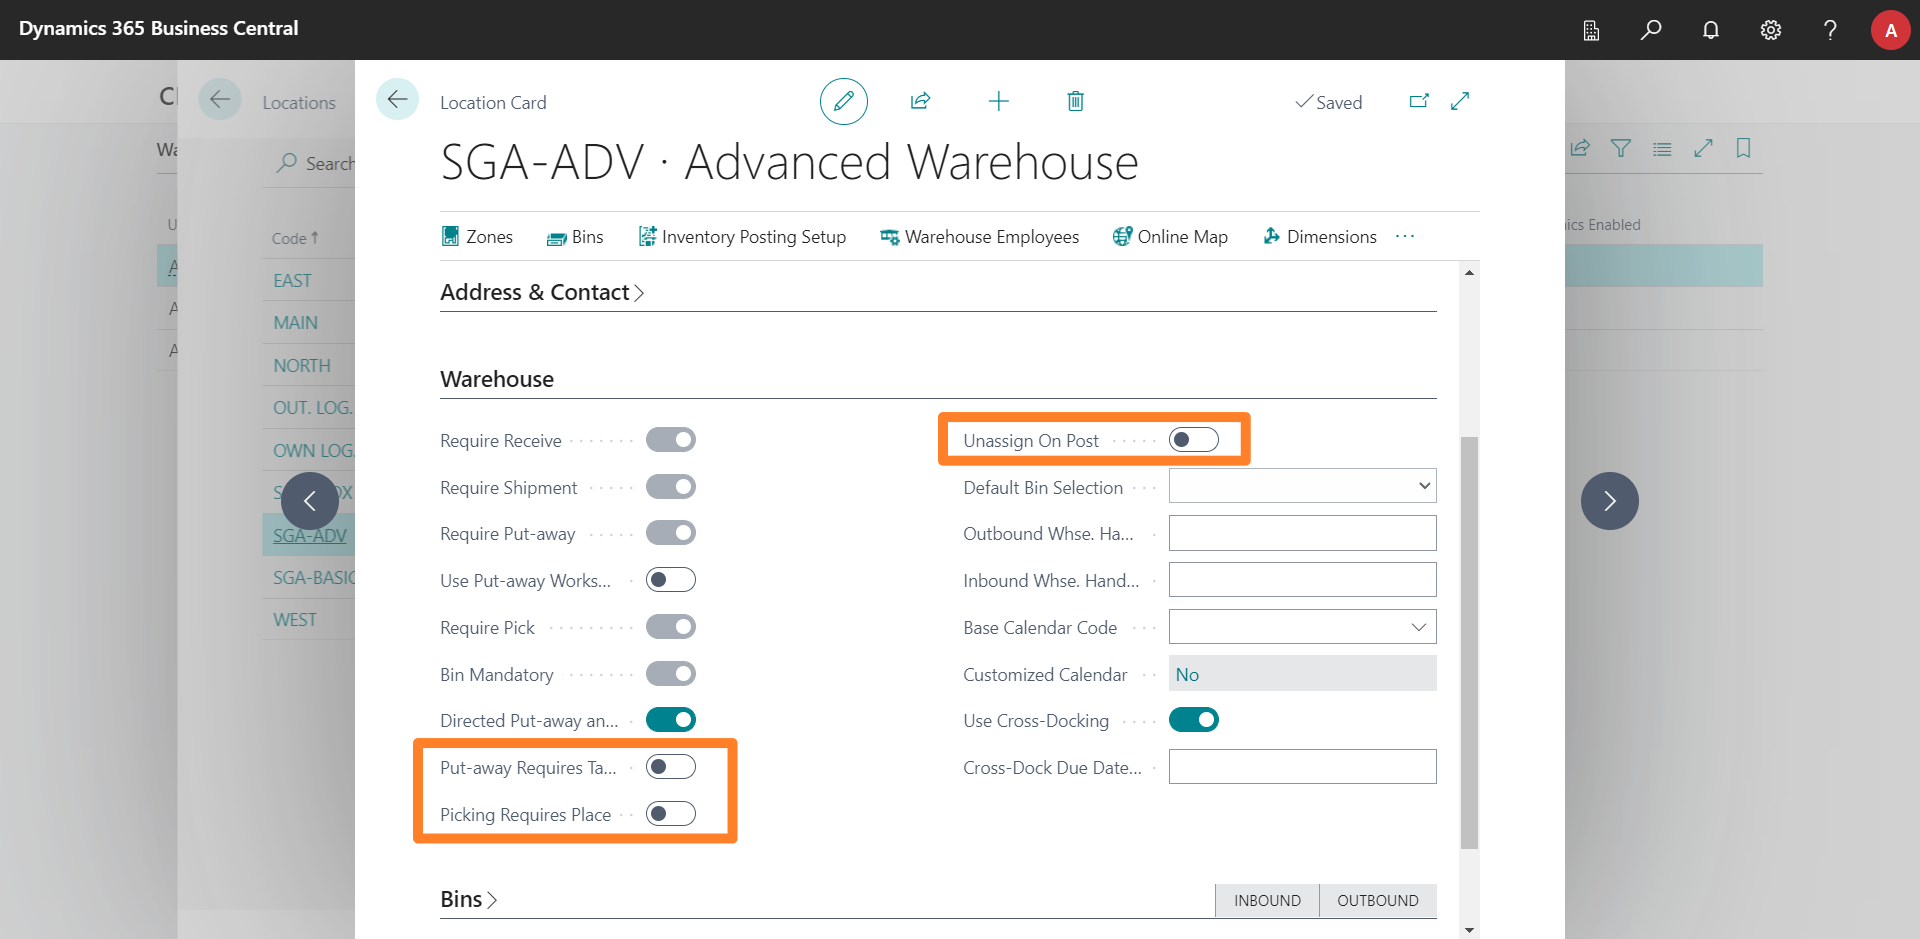
iDynamics Warehouse adds three extra options to the location card, which allow you to define how the mobile application will work:

- Put-away Requires Take. In the case of warehouse put-aways, if unchecked, employees using the application will only need to indicate at which bin they are placing the items. The associated Take line, within Business Central, will be automatically filled in and processed.
- Picking Requires Place. In warehouse pickings, if unchecked, employees using the application will only have to indicate from which bin they are taking the items. The associated Place line, within Business Central, will be automatically filled in and processed.
In every warehouse activity document in Business Central, two lines are generated for each inventory movement (one specifying the start bin and one specifying the end bin of the item). However, in daily use, most warehouses work with a single inbound or outbound bay, which makes it unnecessary for the employee to explicitly indicate where they place the items when performing a pick, or where they take them from when performing a put-away.
By default, iDynamics Warehouse opts for the most agile option for warehouse employees, which is to indicate only the destination or origin of the items. For more complex warehouses, however, where there are multiple inbound or outbound bays, the above options will result in the mobile application requiring the employee to do both steps in the put-away and/or pick activities.
- Unassign On Post. This option affects the behavior of the mobile application when a document is partially posted. If checked, the document will be closed and the employee will have finished with it. If unchecked, the employee will be able to continue working with the document and make as many partial posts as desired, until the document is completed.
Warehouse Employees
If you access the warehouse employees list after installing iDynamics Warehouse, you will see that it has a new action called iDynamics Config. at the top of the screen.
Also, the iDynamics Enabled column shows whether the employee can connect to Business Central using the mobile app or not.

To get started, simply check the iDynamics Enabled checkbox for employees who will be using the mobile app. This will activate all the options by default and will allow managing every document corresponding to the assigned warehouse type.
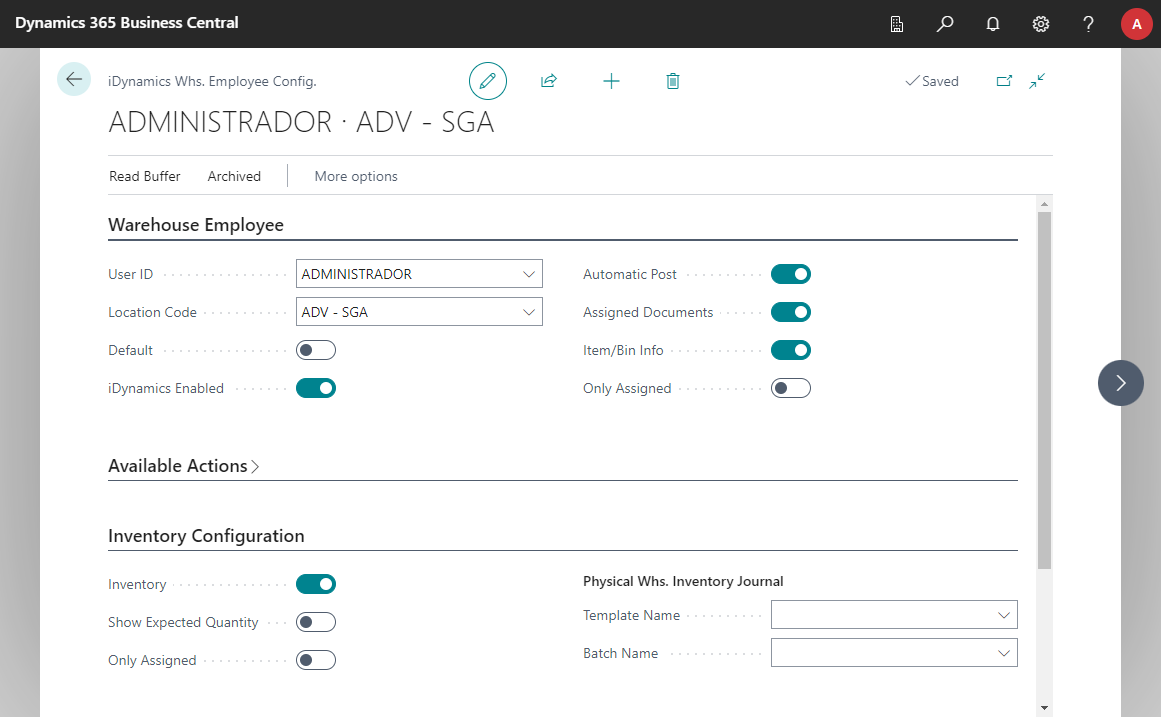
If we want to specify which options an employee can manage from the mobile application, as well as activate the ad hoc movements option (which requires assigning a template/batch section in which to register the movements), we can click on the action iDynamics Config., to open the employee's complete card.

General / Warehouse Employee
- iDynamics Enabled. Enables or disables the ability to work with this warehouse from the mobile device.
- Automatic Post. If selected, the employee will be able to post documents from the mobile application. Otherwise, when employees finish with each document they will mark it as finished, and it will be required to manually perform the posting step from Business Central.
- Assigned Documents. Displays the Tasks tab in the mobile application, with a summary of the assigned documents.
- Item/Bin Info. Enables or disables the option to query information about items and bins in the mobile application.
- Only Assigned. If selected, the employee will only be able to see the documents/activities that have been assigned to him.
Available Actions
This tab shows all the documents which the employee could handle, depending on the setup of the selected warehouse: shipments, receipts, picks, bins, movement activities, sales orders, purchase orders, sales returns, purchase returns, transfers, etc...
Check those that you want the warehouse employee to be able to handle from the mobile application.
If any type of document does not appear, check the setup of the location. For example, the option to handle sales orders will not be available if the location uses shipments, and conversely, the option to handle receipts will not be available if the location is not set up to use this type of document.
Inventory Actions
Allows to indicate whether or not employees will be able to perform inventories from the application. In addition to this, the following options affect the behavior of the mobile application:
- Show Expected Quantity. If checked and a journal has been assigned to the employee, they will see the quantity of items that the system expects for each item/bin combination. If unchecked, the employee will perform a blind count, seeing the assigned bins and items, but not the expected quantity.
- Only Assigned. If this option is checked, adding any line to a physical inventory count will not be allowed. The employee will be able to count the items assigned to them, but will not be able to scan any additional items.
- Template/Batch Name. These fields indicate which template and physical inventory batch section the employee is assigned to. If a template and batch section is assigned, the contents of the batch section will be displayed to the employee in the application as physical inventory counts to be performed.
The template and batch section will point to either the location or item inventory tables, depending on the configuration of the warehouse.
Bin Change Movements
Also called ad hoc movements, this option allows users to move an item from one bin to another. To do this, the employee will indicate the source and destination bins, along with the item and quantity to be moved, and when the data is sent from the mobile device, it will be recorded through the reclassification journal indicated here.
As with the inventory fields, the reclassification journal tables to be selected will be different depending on the location setup.
Items - optional tracking
Working with serial and/or lot numbers can be especially useful in quality controls where it is necessary to find out which customers received products with a particular lot number or when you need to find out which lot a defective component came from.
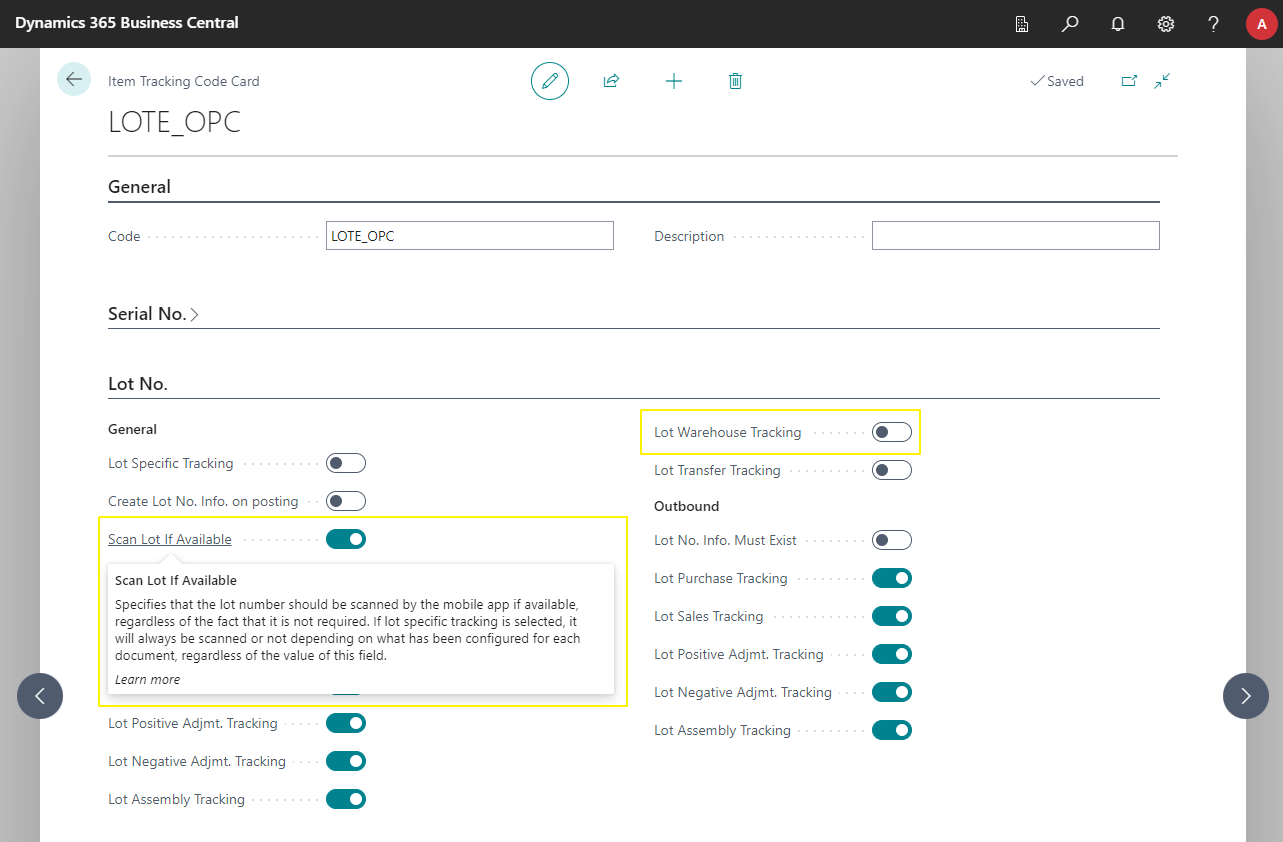
iDynamics Warehouse supports item tracking across all warehouse operations. When you work with items with inventory tracking that do not have "Lot Warehouse Tracking" enabled, you can optionally scan and send tracking information to Business Central, even though it is not required. To do this, enable the option "Scan Lot If Available" or "Scan SN If Available" (as appropriate) in the Item Tracking Code Card.

Application Setup
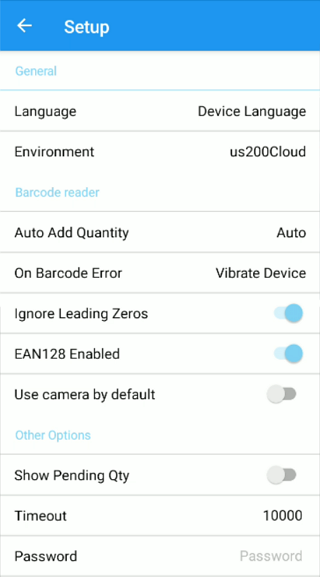
Some options can be configured at the mobile application level, by accessing the setup screen from the gear icon on the login and home screens, or from the side menu of the documents.

Language
The application will use the device language by default, but you can manually select any of the languages available.
Environment
It shows us the connection setup screen with our Business Central or NAV server. In the server connection chapter, you will find more information about this.
Add Units When Scanning
When using a barcode scanner to read an item's label, this option allows the application to automatically add units to the selected line. The available choices are:
- Auto. If the item has a serial number, one unit will be added, and if the barcode is a GS1-128 that includes units, the quantity indicated on the barcode will be added.
- Always. If the barcode is a GS1-128 that includes units, that quantity will be added. Otherwise, one unit will be added to the current quantity.
- Never. Units are not automatically added when reading item barcodes.
Error Warning
Allows you to specify whether, when an unidentified barcode is read or throws an error, the application will beep, make the device vibrate, or both.
Ignore Leading Zeros
When the employee reads an item's barcode, a check is made to see if the code read is registered as an item code, cross-reference (of the barcode type), or item identifier.
Supposing that a barcode with the identifier '00000123' is read, the application will look for exactly that code, or '123' depending on the selected option.
Password
Allows you to password-protect this setup screen. If a value is entered in this field, it will be necessary to enter this password each time this screen is accessed again.