Inbounds and Outbounds Handling from Sales/Purchases
Scenario
This is the scenario that applies to customers who only want to control the total inventory of each item in the warehouse, but do not want to keep track of its specific bin.
This scenario is also the most common for customers who work with serial or lot numbers, and whose main requirement is to speed up the inbound inventory, by scanning the corresponding barcodes (to register the lots/series in BC), as well as to keep track of which serial or lot numbers are sent to each customer.
If this is not your case, please check the different scenarios described here and select the one that best suits your company.
Location Setup
The first and essential step to be able to work with iDynamics Warehouse is to define a location, configured to work only with sales and purchase documents. If this has already been done, you can go directly to the next step of the guide.
To create the location, search for Locations in the Business Central search bar. Since you will not be using any of the warehouse documents, all you will need to do is give it a name and leave the default options.
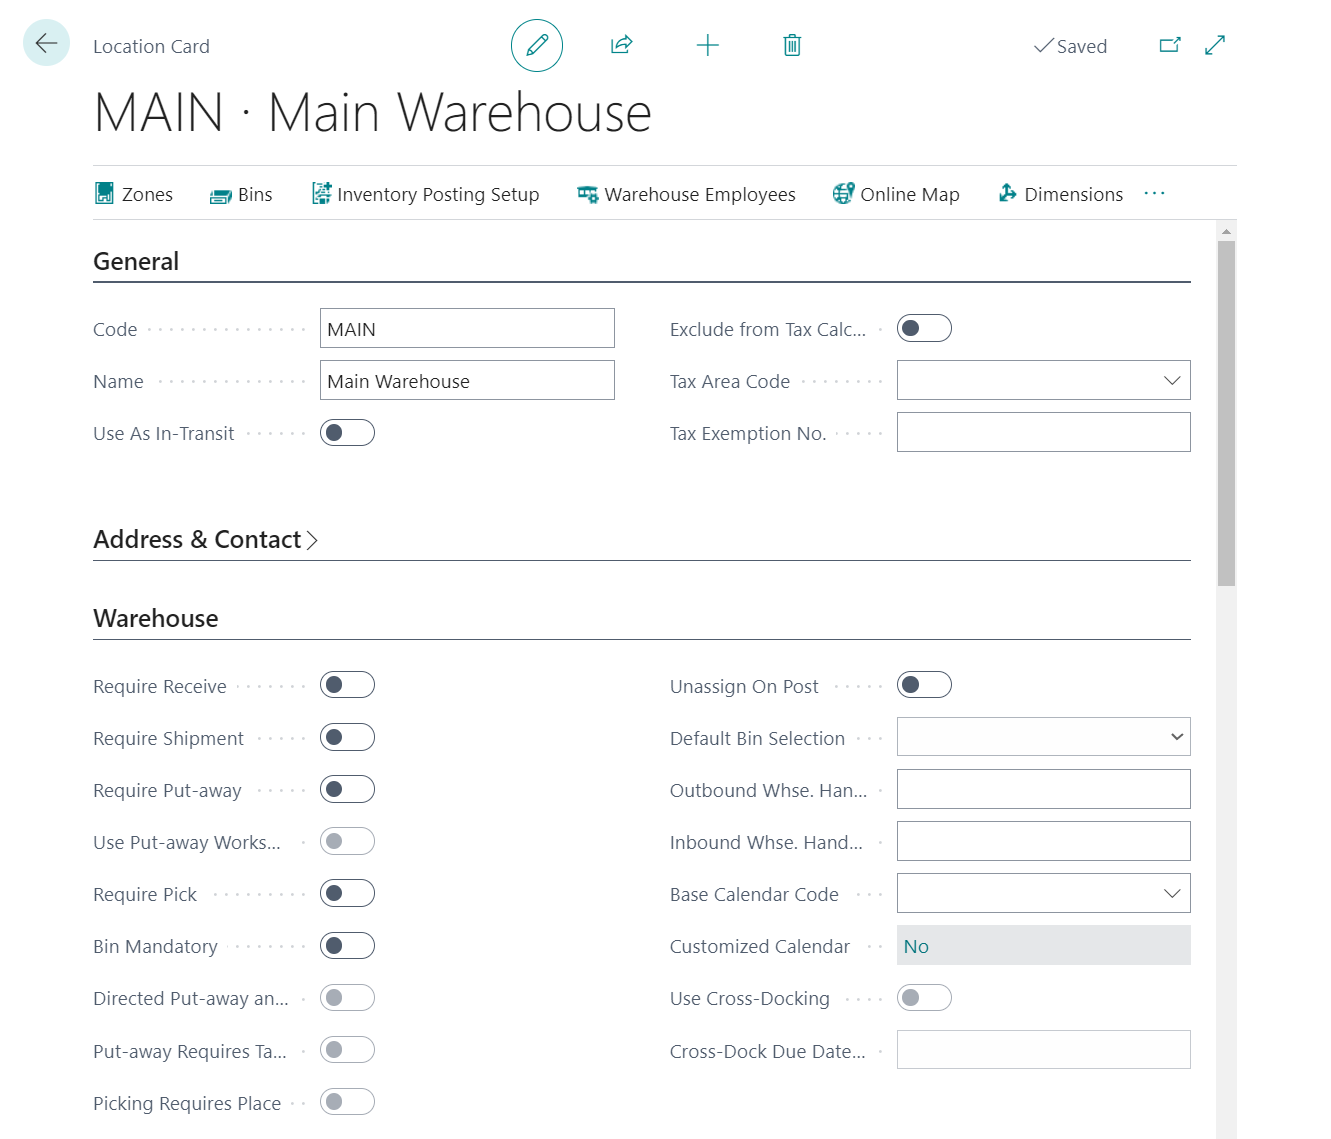
The above screenshot shows the MAIN location, which is configured in the Business Central demo company.
Inventory Accounts
This is a mandatory step in Business Central whenever a location is created. It is not a particular requirement of iDynamics Warehouse but, without this setting, it will not be possible to receive and ship items in the location.
From the card of the location, select the Inventory Posting Setup action.

In this table you must create a record for each inventory posting group that you have configured in Business Central, specifying the accounts to which the inventory movements of this location will be assigned.

The above example corresponds to the configuration required for the MAIN location of the Business Central demo company.
Configure Warehouse Employees
The Warehouse Employees table allows you to link Business Central users to each of the available locations, specifying which locations each of them can manage. In the case of iDynamics Warehouse, this table also allows us to specify which users will have access to the mobile application and what options will be available to them.
To begin, create a warehouse employee record in this table for your user and for each of the locations you want to be able to manage from the mobile application. Remember to check the iDynamics option to grant access via the mobile app.

Connect the Mobile App
Once there is at least one location in your company, and a warehouse employee has been created with the iDynamics option checked, we can proceed to configure the mobile application.
Follow this connection guide to connect the app to your Business Central and, once you have done so, proceed to the next step of this guide.
Handling a Purchase Order
Creating the Purchase Order
To familiarize yourself with the use of the application, let's create a purchase order and handle it from the mobile application. To make the order appear in the mobile application:
- Create a purchase order for any vendor.
- Select the location that you have configured in the mobile application as the receipt location.
- Create several purchase lines of type Item.
- Verify that the purchase lines have the location assigned in the Location Code field.
- Release the purchase order.
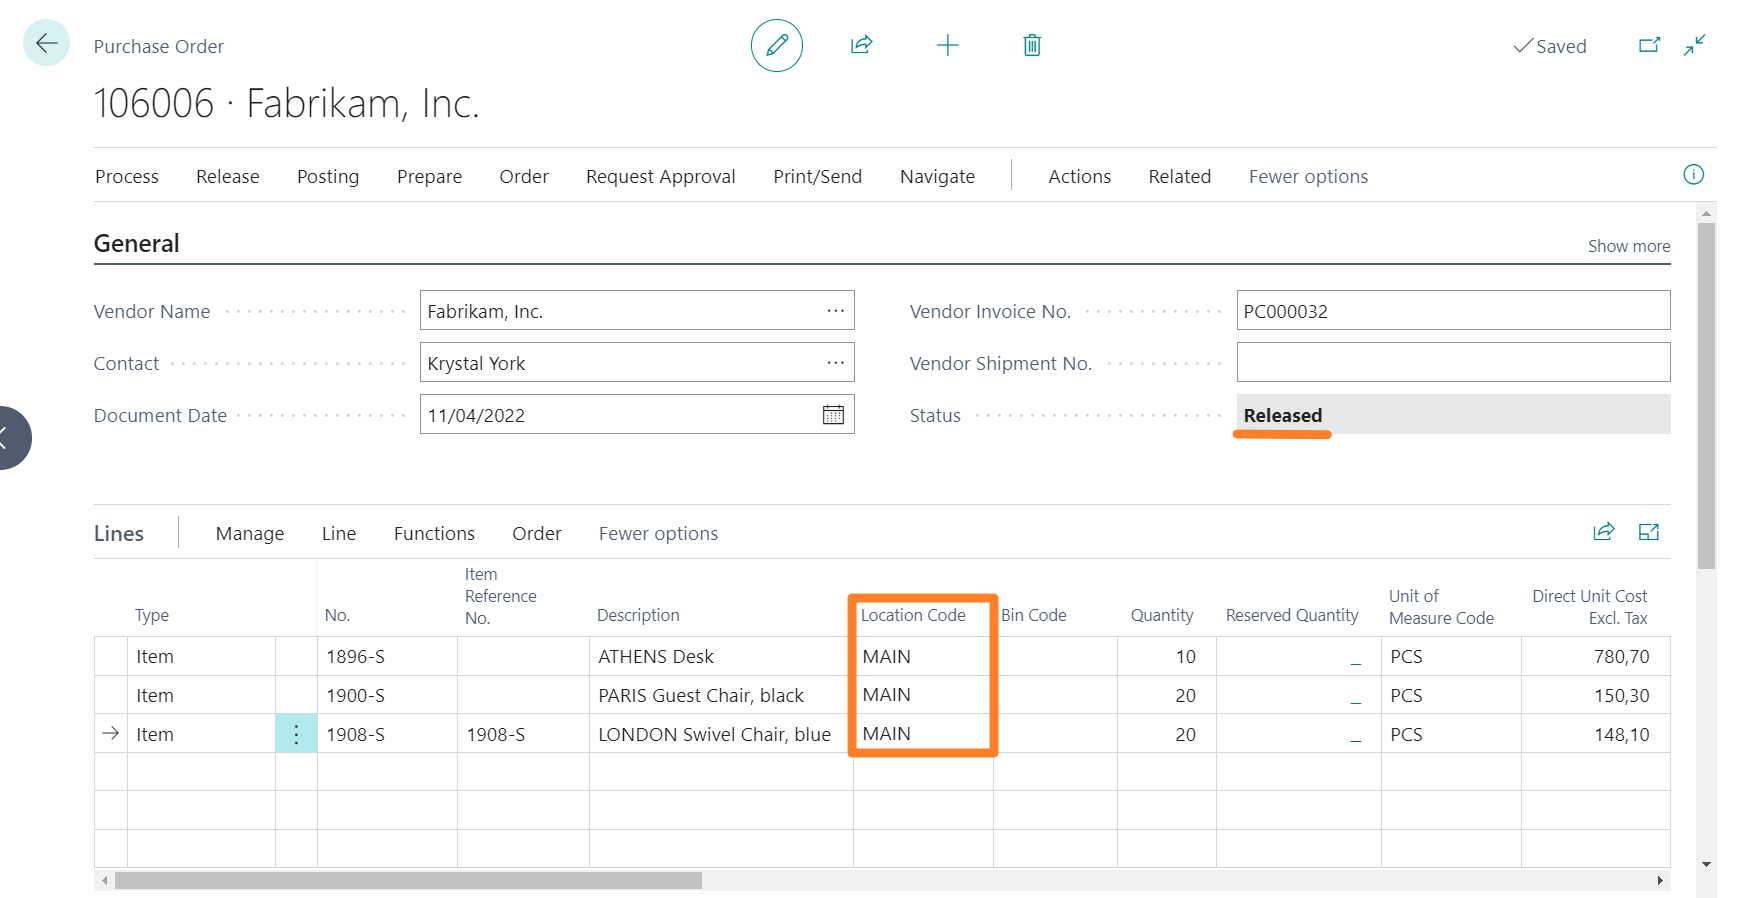
Once you release the order, it will automatically appear when you navigate to the purchase list in the mobile application (you can drag the list down to refresh it, if you were already in it).
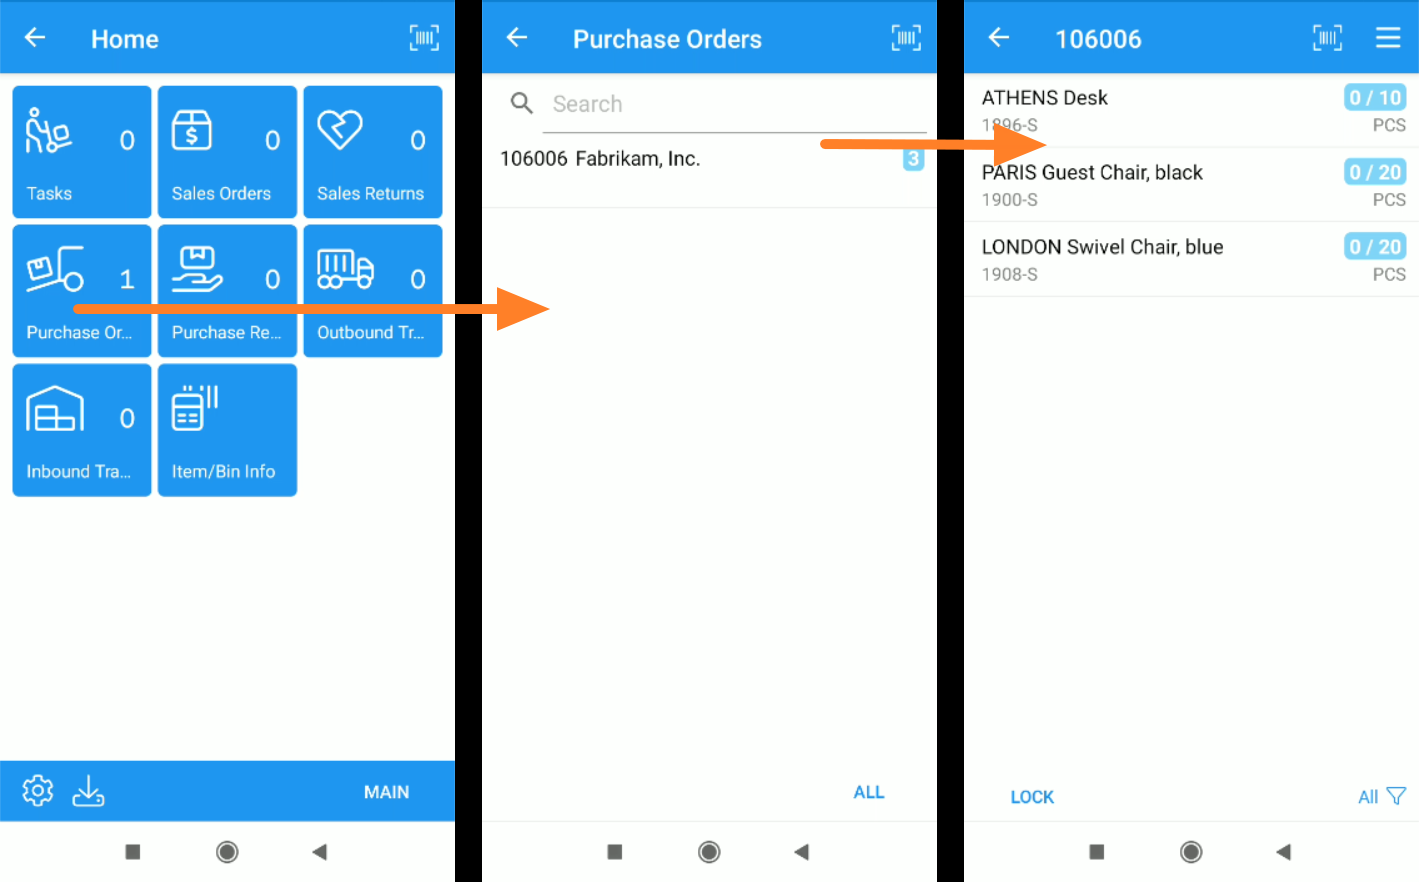
A detail to take into account: although it is not common, an order could have lines assigned to different locations. The mobile application will only show those lines that are assigned to the currently active location and, in fact, it will only show the document if there is a line assigned to it.
Assigning/Locking the Order
Since the mobile application allows working without a network connection during the handling of any document, the application always requires that we mark it as locked by the user who is going to handle it and thus avoid two users trying to handle it at the same time by mistake. The assignment can be done in two ways: either the user himself locks the document from the mobile application, or the employee is assigned directly from Business Central.
To do this from Business Central, use the action Process > Assign Warehouse Employees/Questionnaires. This option allows you to assign a different employee to each of the locations assigned to the document rows.

If you assign it from Business Central and drag down the purchase order list in the mobile application (to update the list), you will see that your name appears below the order code, and when you enter the document, it becomes available for editing.
To assign it from the mobile application, use the option available in the lower-left corner while viewing the document, or scan the barcode of an item (the application will ask you if you want to lock the document to work with it).
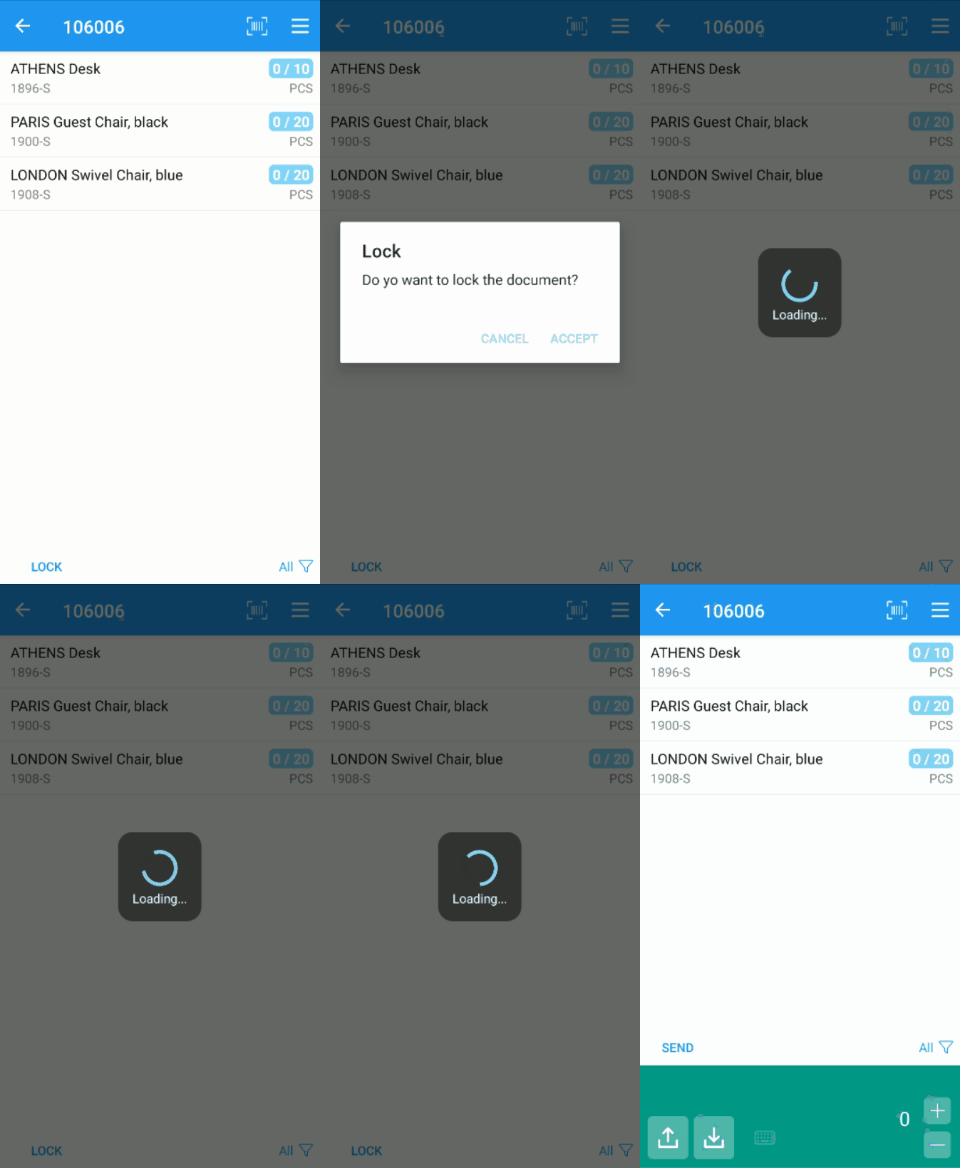
If you lock it from the mobile application, you will see that, in Business Central, a record has been created on the warehouse employees/questionnaires assignment table, just as if it had been made from the purchase order action.
To unlock a document from the mobile application, you will find a button in the side menu of the document.
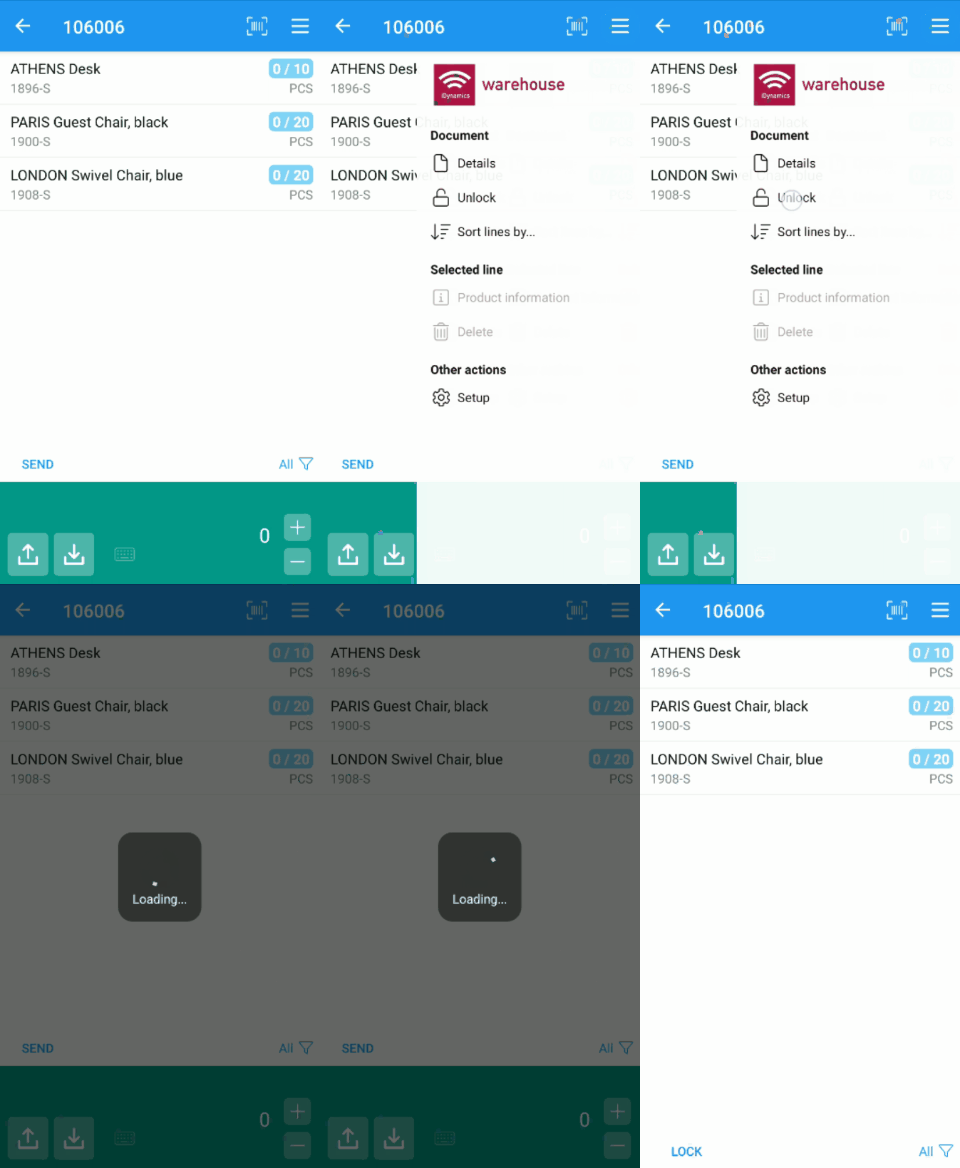
In the home screen of the application you will see that there is a box called Tasks. In it, the user will see all the documents, of any type, that have been assigned to them.
Item Scanning
Once we have the document locked by our user, we can start scanning barcodes and indicate quantities. In this case, we have several options, depending on whether we work with serial/batch numbers or not.
For companies that work without serial/lot numbers, the employee can select the item by tapping on it, and confirm the quantity using one of the buttons in the lower panel of the document.
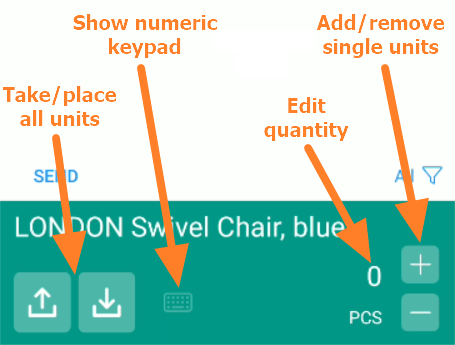
If you want employees to confirm quantities by scanning item barcodes (one scan = one unit), you can configure that each scan of a code automatically adds one unit to the line (by default the application only does this with items with serial numbers or that have the quantity specified in the barcode).
For companies that work with serial/lot numbers, the employee can select a line of the document, and start scanning serial/lot barcodes directly, or scan the barcode of the item, to select the corresponding line, and then scan all serial or lot barcodes that apply to the item.
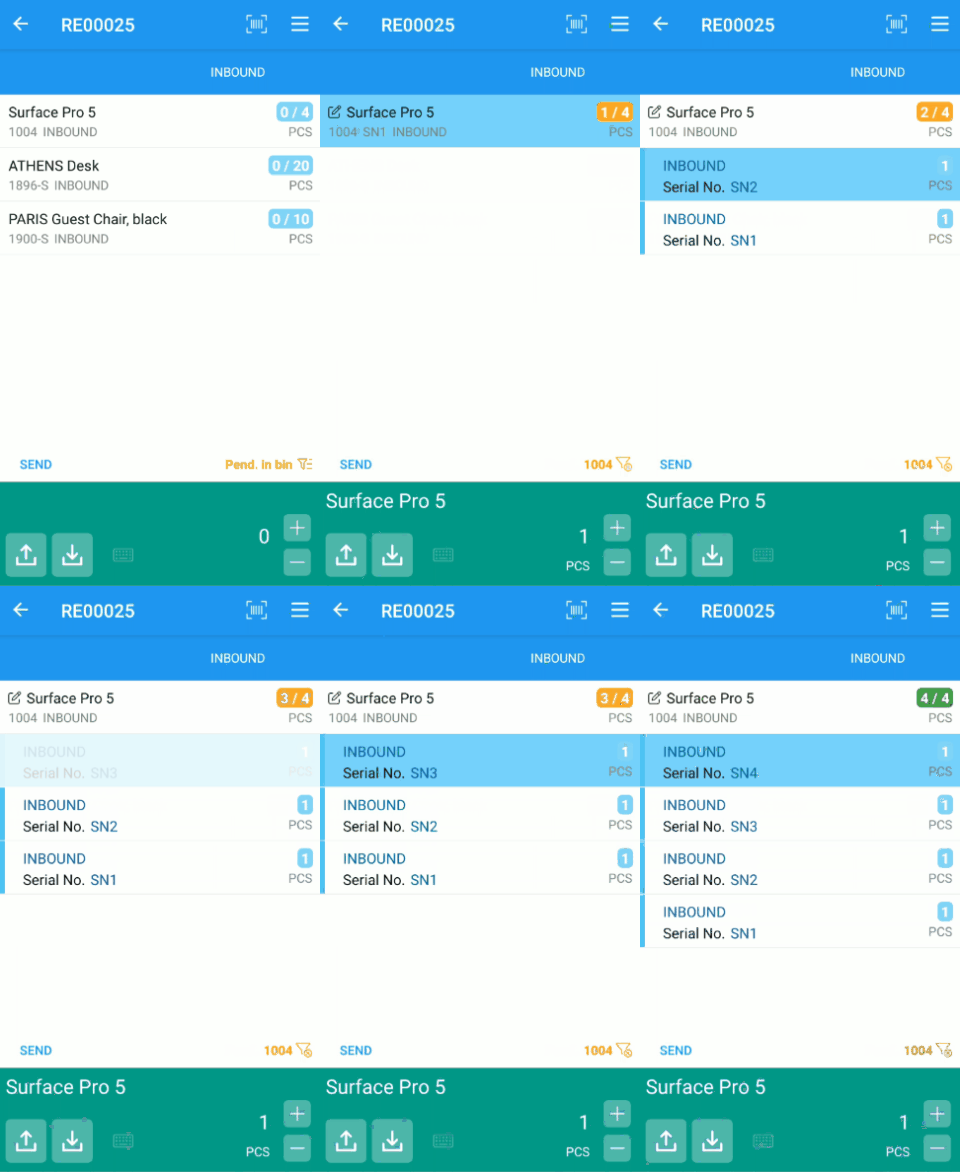
In the video above you can see the result of scanning a barcode 1000, corresponding to one of the items, and then the barcodes SN1, SN2, SN3 and SN4, corresponding to the serial numbers received. When the first serial or lot number is scanned, it is assigned directly to the selected line, but when there is more than one (the second, SN2 in this case, is scanned) the application breaks down the line into several sub-lines, one for each serial or lot number scanned.
If you are going to use your mobile or tablet camera for scanning barcodes, we recommend that you refer to the Using the Camera as a Barcode Scanner guide.
Available Filters
After you scan the barcode of an item, you will see that the list is filtered and shows only the lines of the document that correspond to it. By tapping on the filter button at the bottom right of the list, you can remove this filter and display the list of items to be handled (or the document summary, if you have already finished with it).
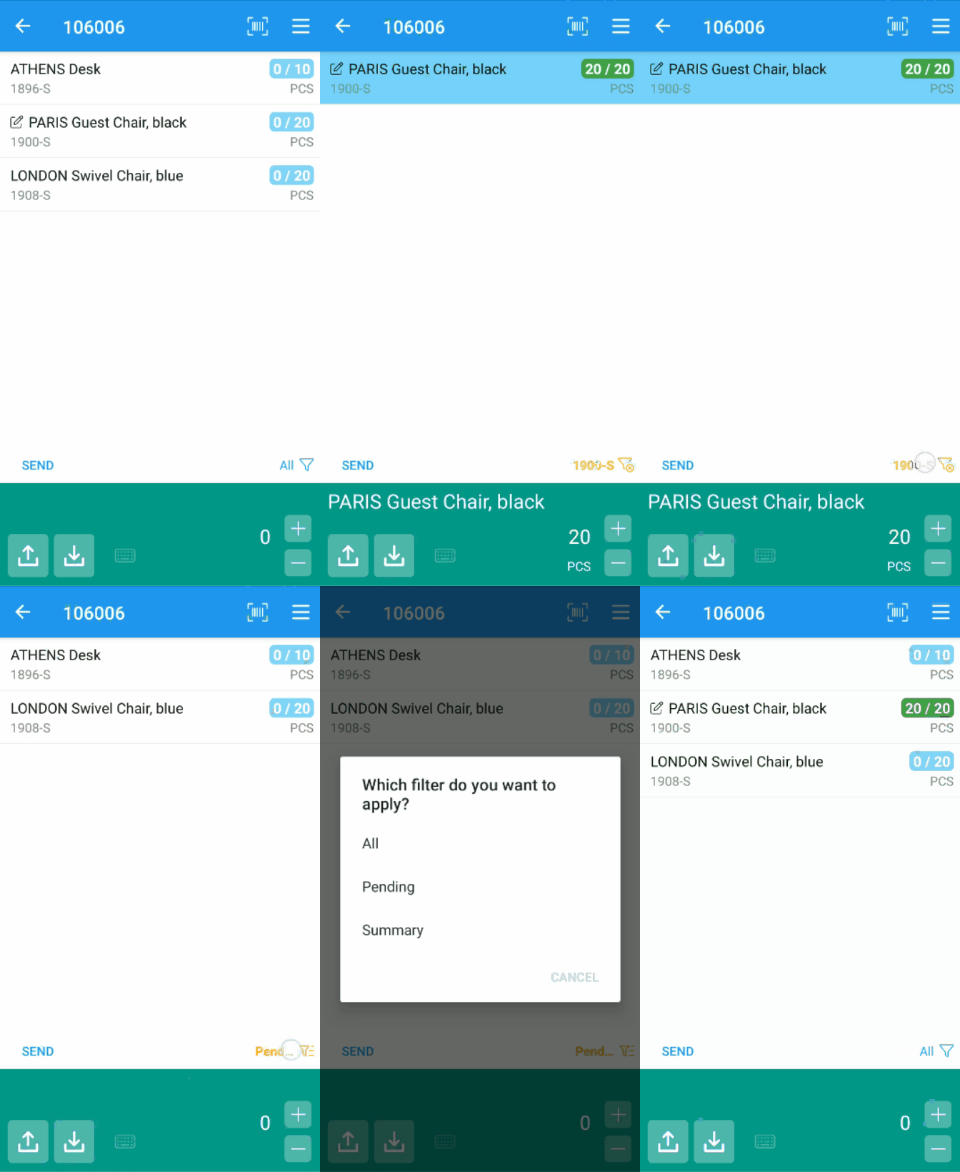
In addition, when the list is not filtered by item, you can click on the same button to toggle between viewing all the lines in the document or only the pending ones.
Handle Order Lines
Now that you know how to set the received quantity for each line (scanning items), and how to use the filter button to update the lines visible at any given time, it is time to confirm the quantities of all the items in the order, if you have not already done so.
To do this, if you are going to work selecting the lines manually (by tapping your finger on them), the steps to follow will be:
- Select line.
- Scan serial/lot barcodes (optional).
- Confirm the quantity.
- Return to step 1 until there are no lines left.
And, if you are going to work scanning barcodes for each item:
- Scan the barcode of an item (the list will be filtered to show the item lines).
- Scan serial/lot barcodes (optional).
- Confirm the quantity.
- Remove the item filter to see the list of pending lines.
- Return to step 1 until there are no lines left.
We recommend practicing these steps with the employees who will be using the mobile application, as they will be common to all documents, and, once mastered, they will enable you to handle inbound and outbound tasks with the application in an efficient way.
Send Data to Business Central
Once the document is locked, reading of quantities is always performed in the mobile application, without connecting to the server except in cases (purchase return orders, sales orders) where the application checks the inventory available in the location.
This means that the data is on the mobile device, but not in Business Central. To send it to the server, you can tap at any time on the Send action, located at the bottom left of the list of lines.
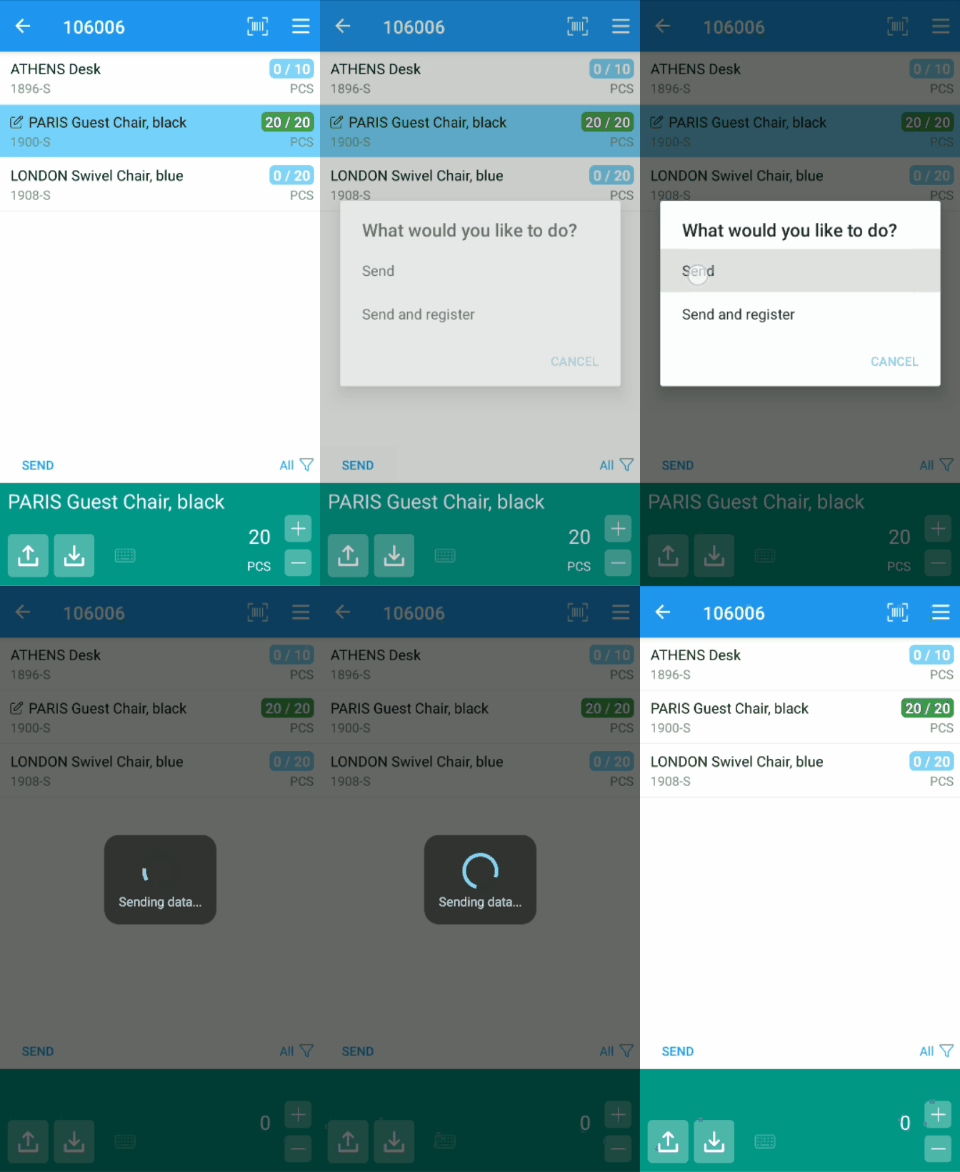
Once the data has been sent to Business Central, you will see that the modified icons (a pencil on a square) on the document lines disappear. Also, if we access the purchase order in Business Central, you will see that the order lines have the Qty. Read field filled with the quantities assigned in the mobile application.
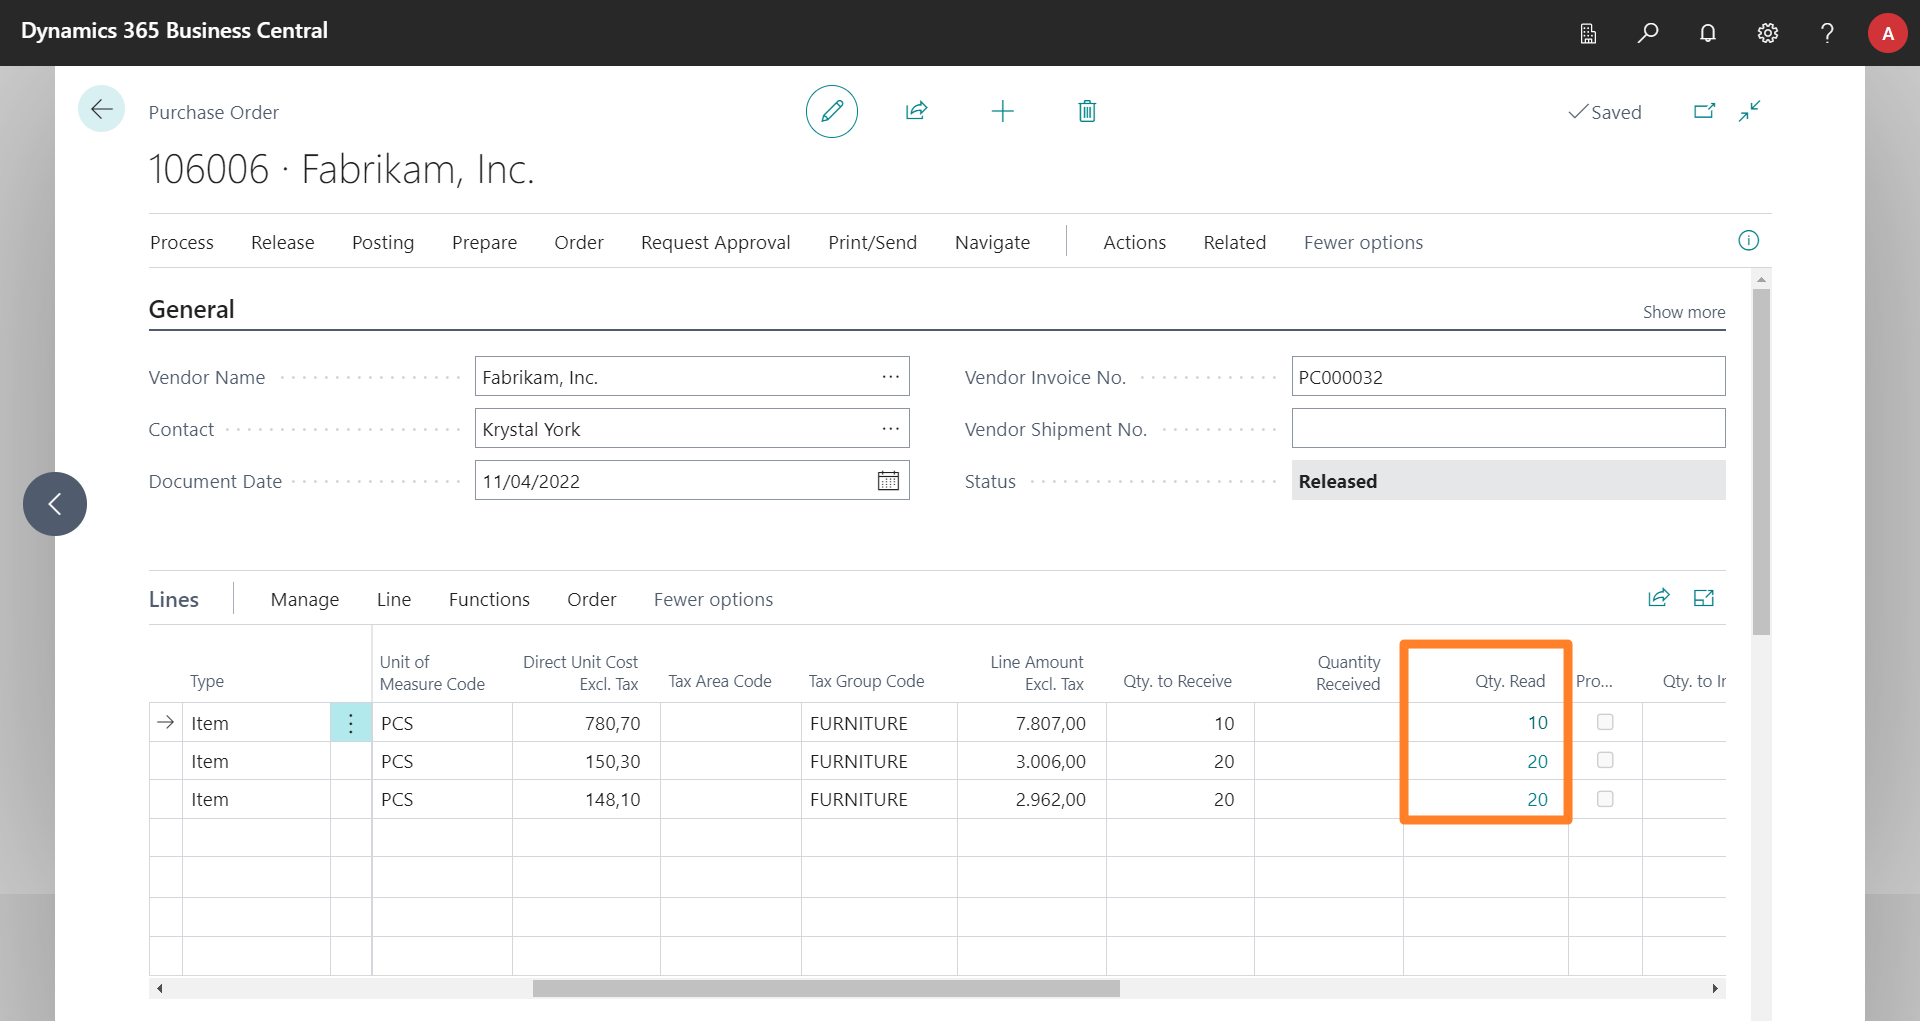
If you have scanned lot or serial numbers for any item, you can click on the Quantity Read field to show their details.
Post Quantities Received
Once we have updated the quantities of all (or part) of the lines to be received in the order, we can select the Send and Post action, which is displayed by tapping on the Send button.
This action will send all changes to the document if any, and post the quantities in Business Central.
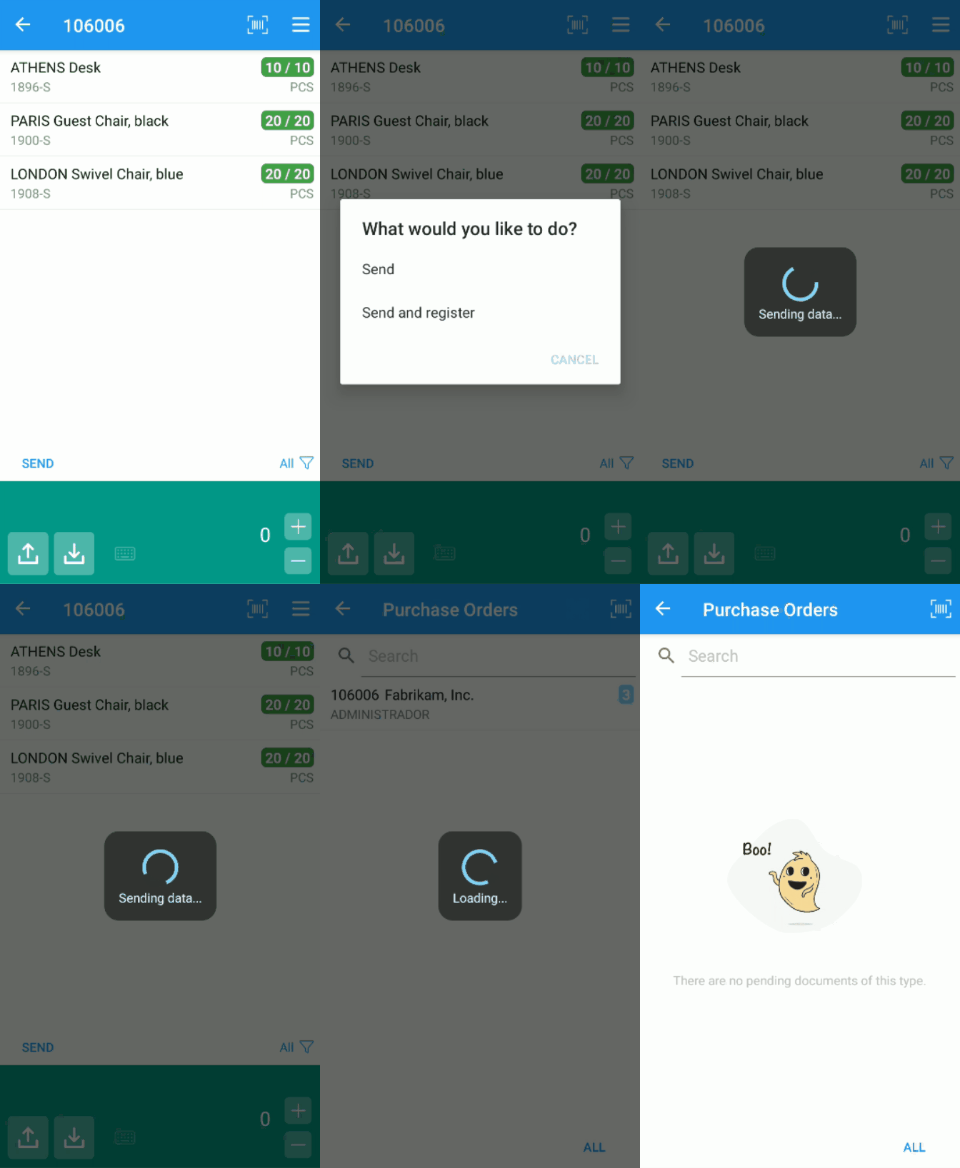
If the document has no more pending lines, the application will return the user to the list of documents. In addition, in the Business Central purchase order, we can verify that the quantities of the document already appear as received and are available in inventory (the action posts the receipt of the items, but will not invoice the order).
Other Documents
Although the previous example corresponded to the handling of a purchase order, the process will be identical for all documents (sales orders, sales, and purchase return orders, transfer orders) that can be handled from the mobile application.
Once you have handled a purchase order, we recommend that you repeat the steps of the previous point, but with a sales order, to familiarize yourself with the application and review the learned concepts.
Other Tasks
In addition to managing sales, transfers and purchases, users will be able to perform warehouse inventory counts and consult information on locations and items. And, if you have the paid version, you will be able to create questionnaires to collect additional information on any of the documents or lines handled by the application. Click on any of the following links to access the guides corresponding to each of these features:
Any questions?
If after following this guide you have any questions about the use of the application, think we could improve it in any way, or have had any problems setting it up, please do not hesitate to contact us via our support portal.